Subscribe to the newsletter for all the latest crafts + access to the creative library!
[data-ff-el="root"].ff-623350297e7ec064e82a1d10 *,
[data-ff-el="root"].ff-623350297e7ec064e82a1d10 *::before,
[data-ff-el="root"].ff-623350297e7ec064e82a1d10 *::after {
box-sizing: border-box;
}
[data-ff-el="root"].ff-623350297e7ec064e82a1d10 [tabindex="-1"]:focus {
outline: none !important;
}
[data-ff-el="root"].ff-623350297e7ec064e82a1d10 h1,
[data-ff-el="root"].ff-623350297e7ec064e82a1d10 h2,
[data-ff-el="root"].ff-623350297e7ec064e82a1d10 h3,
[data-ff-el="root"].ff-623350297e7ec064e82a1d10 h4,
[data-ff-el="root"].ff-623350297e7ec064e82a1d10 h5,
[data-ff-el="root"].ff-623350297e7ec064e82a1d10 h6 {
margin-top: 0;
margin-bottom: 0.7em;
}
[data-ff-el="root"].ff-623350297e7ec064e82a1d10 p {
margin-top: 0;
margin-bottom: 1rem;
}
[data-ff-el="root"].ff-623350297e7ec064e82a1d10 ol,
[data-ff-el="root"].ff-623350297e7ec064e82a1d10 ul,
[data-ff-el="root"].ff-623350297e7ec064e82a1d10 dl {
margin-top: 0;
margin-bottom: 1.4rem;
}
[data-ff-el="root"].ff-623350297e7ec064e82a1d10 ol ol,
[data-ff-el="root"].ff-623350297e7ec064e82a1d10 ul ul,
[data-ff-el="root"].ff-623350297e7ec064e82a1d10 ol ul,
[data-ff-el="root"].ff-623350297e7ec064e82a1d10 ul ol {
margin-bottom: 0;
}
[data-ff-el="root"].ff-623350297e7ec064e82a1d10 b,
[data-ff-el="root"].ff-623350297e7ec064e82a1d10 strong {
font-weight: bolder;
}
[data-ff-el="root"].ff-623350297e7ec064e82a1d10 small {
font-size: 80%;
}
[data-ff-el="root"].ff-623350297e7ec064e82a1d10 sub,
[data-ff-el="root"].ff-623350297e7ec064e82a1d10 sup {
position: relative;
font-size: 75%;
line-height: 0;
vertical-align: baseline;
}
[data-ff-el="root"].ff-623350297e7ec064e82a1d10 sub {
bottom: -0.25em;
}
[data-ff-el="root"].ff-623350297e7ec064e82a1d10 sup {
top: -0.5em;
}
[data-ff-el="root"].ff-623350297e7ec064e82a1d10 {
color: #000000;
text-decoration: none;
background-color: transparent;
-webkit-text-decoration-skip: objects;
}
[data-ff-el="root"].ff-623350297e7ec064e82a1d10 a:hover {
color: #4396fd;
text-decoration: none;
}
[data-ff-el="root"].ff-623350297e7ec064e82a1d10 img {
border-style: none;
vertical-align: middle;
}
[data-ff-el="root"].ff-623350297e7ec064e82a1d10 svg:not(:root) {
overflow: hidden;
}
[data-ff-el="root"].ff-623350297e7ec064e82a1d10,
[data-ff-el="root"].ff-623350297e7ec064e82a1d10 area,
[data-ff-el="root"].ff-623350297e7ec064e82a1d10 button,
[data-ff-el="root"].ff-623350297e7ec064e82a1d10 [role="button"],
[data-ff-el="root"].ff-623350297e7ec064e82a1d10 input,
[data-ff-el="root"].ff-623350297e7ec064e82a1d10 label,
[data-ff-el="root"].ff-623350297e7ec064e82a1d10 select,
[data-ff-el="root"].ff-623350297e7ec064e82a1d10 summary,
[data-ff-el="root"].ff-623350297e7ec064e82a1d10 textarea {
touch-action: manipulation;
}
[data-ff-el="root"].ff-623350297e7ec064e82a1d10 label {
display: inline-block;
font-weight: bolder;
margin-bottom: 0.7rem;
}
[data-ff-el="root"].ff-623350297e7ec064e82a1d10 button:focus {
outline: 1px dotted;
}
[data-ff-el="root"].ff-623350297e7ec064e82a1d10 input,
[data-ff-el="root"].ff-623350297e7ec064e82a1d10 button,
[data-ff-el="root"].ff-623350297e7ec064e82a1d10 select,
[data-ff-el="root"].ff-623350297e7ec064e82a1d10 optgroup,
[data-ff-el="root"].ff-623350297e7ec064e82a1d10 textarea {
margin: 0;
font-size: inherit;
font-family: inherit;
line-height: inherit;
}
[data-ff-el="root"].ff-623350297e7ec064e82a1d10 button,
[data-ff-el="root"].ff-623350297e7ec064e82a1d10 input {
overflow: visible;
}
[data-ff-el="root"].ff-623350297e7ec064e82a1d10 button,
[data-ff-el="root"].ff-623350297e7ec064e82a1d10 select {
text-transform: none;
}
[data-ff-el="root"].ff-623350297e7ec064e82a1d10 button,
html[data-ff-el="root"].ff-623350297e7ec064e82a1d10 [type="button"],
[data-ff-el="root"].ff-623350297e7ec064e82a1d10 [type="reset"],
[data-ff-el="root"].ff-623350297e7ec064e82a1d10 [type="submit"] {
-webkit-appearance: button;
}
[data-ff-el="root"].ff-623350297e7ec064e82a1d10 button::-moz-focus-inner,
[data-ff-el="root"].ff-623350297e7ec064e82a1d10 [type="button"]::-moz-focus-inner,
[data-ff-el="root"].ff-623350297e7ec064e82a1d10 [type="reset"]::-moz-focus-inner,
[data-ff-el="root"].ff-623350297e7ec064e82a1d10 [type="submit"]::-moz-focus-inner {
padding: 0;
border-style: none;
}
[data-ff-el="root"].ff-623350297e7ec064e82a1d10 input[type="radio"],
[data-ff-el="root"].ff-623350297e7ec064e82a1d10 input[type="checkbox"] {
padding: 0;
box-sizing: border-box;
}
[data-ff-el="root"].ff-623350297e7ec064e82a1d10 input[type="date"],
[data-ff-el="root"].ff-623350297e7ec064e82a1d10 input[type="time"],
[data-ff-el="root"].ff-623350297e7ec064e82a1d10 input[type="datetime-local"],
[data-ff-el="root"].ff-623350297e7ec064e82a1d10 input[type="month"] {
-webkit-appearance: listbox;
}
[data-ff-el="root"].ff-623350297e7ec064e82a1d10 textarea {
resize: vertical;
overflow: auto;
}
[data-ff-el="root"].ff-623350297e7ec064e82a1d10 [type="number"]::-webkit-inner-spin-button,
[data-ff-el="root"].ff-623350297e7ec064e82a1d10 [type="number"]::-webkit-outer-spin-button {
height: auto;
}
[data-ff-el="root"].ff-623350297e7ec064e82a1d10 [type="search"] {
outline-offset: -2px;
-webkit-appearance: none;
}
[data-ff-el="root"].ff-623350297e7ec064e82a1d10 [type="search"]::-webkit-search-cancel-button,
[data-ff-el="root"].ff-623350297e7ec064e82a1d10 [type="search"]::-webkit-search-decoration {
-webkit-appearance: none;
}
[data-ff-el="root"].ff-623350297e7ec064e82a1d10 ::-webkit-file-upload-button {
font: inherit;
-webkit-appearance: button;
}
[data-ff-el="root"].ff-623350297e7ec064e82a1d10 [hidden] {
display: none !important;
}
[data-ff-el="root"].ff-623350297e7ec064e82a1d10 .fd-form-control {
width: 100%;
display: block;
outline: none;
position: relative;
-webkit-appearance: none;
}
[data-ff-el="root"].ff-623350297e7ec064e82a1d10 .fd-form-control:focus {
outline: none;
}
[data-ff-el="root"].ff-623350297e7ec064e82a1d10 .fd-form-control::-webkit-input-placeholder {
color: transparent !important;
opacity: 0 !important;
}
[data-ff-el="root"].ff-623350297e7ec064e82a1d10 .fd-form-control::-moz-placeholder {
color: transparent !important;
opacity: 0 !important;
}
[data-ff-el="root"].ff-623350297e7ec064e82a1d10 .fd-form-control:-ms-input-placeholder {
color: transparent !important;
opacity: 0 !important;
}
[data-ff-el="root"].ff-623350297e7ec064e82a1d10 .fd-form-control::placeholder {
color: transparent !important;
opacity: 0 !important;
}
[data-ff-el="root"].ff-623350297e7ec064e82a1d10 .fd-form-label {
top: 0;
left: 0;
right: 0;
margin: 0;
overflow: hidden;
position: absolute;
white-space: nowrap;
text-overflow: ellipsis;
pointer-events: none;
}
[data-ff-el="root"].ff-623350297e7ec064e82a1d10 .fd-form-control:not(:-moz-placeholder-shown)+.fd-form-label {
opacity: 0;
}
[data-ff-el="root"].ff-623350297e7ec064e82a1d10 .fd-form-control:not(:-ms-input-placeholder)+.fd-form-label {
opacity: 0;
}
[data-ff-el="root"].ff-623350297e7ec064e82a1d10 .fd-form-control:not(:placeholder-shown)+.fd-form-label {
opacity: 0;
}
[data-ff-el="root"].ff-623350297e7ec064e82a1d10 .fd-form-description {
margin: 5px 0 0 0;
font-size: 0.8em;
}
[data-ff-el="root"].ff-623350297e7ec064e82a1d10 .fd-form-feedback {
margin: 5px 0 0 0;
font-size: 0.8em;
}
[data-ff-el="root"].ff-623350297e7ec064e82a1d10 .fd-form-group {
margin: 0 0 15px;
position: relative;
}
[data-ff-el="root"].ff-623350297e7ec064e82a1d10 .fd-form-group.fd-has-success .fd-form-feedback,
[data-ff-el="root"].ff-623350297e7ec064e82a1d10 .fd-form-group.fd-has-success .fd-form-check {
color: #02dba8 !important;
}
[data-ff-el="root"].ff-623350297e7ec064e82a1d10 .fd-form-group.fd-has-success .fd-form-control {
color: #02dba8 !important;
border-color: #02dba8 !important;
}
[data-ff-el="root"].ff-623350297e7ec064e82a1d10 .fd-form-group.fd-has-success .fd-form-feedback {
display: block;
}
[data-ff-el="root"].ff-623350297e7ec064e82a1d10 .fd-form-group.fd-has-error .fd-form-feedback,
[data-ff-el="root"].ff-623350297e7ec064e82a1d10 .fd-form-group.fd-has-error .fd-form-check {
color: #eb3d3b !important;
}
[data-ff-el="root"].ff-623350297e7ec064e82a1d10 .fd-form-group.fd-has-error .fd-form-control {
color: #eb3d3b !important;
border-color: #eb3d3b !important;
}
[data-ff-el="root"].ff-623350297e7ec064e82a1d10 .fd-form-group.fd-has-error .fd-form-feedback {
display: block;
}
[data-ff-el="root"].ff-623350297e7ec064e82a1d10 .fd-btn {
cursor: pointer;
display: -webkit-inline-box;
display: inline-flex;
outline: none;
max-width: 100%;
font-style: normal;
text-align: center;
-webkit-box-align: center;
align-items: center;
text-shadow: none;
white-space: normal;
-webkit-box-pack: center;
justify-content: center;
text-decoration: none;
}
[data-ff-el="root"].ff-623350297e7ec064e82a1d10 .fd-btn:hover {
outline: none;
}
[data-ff-el="root"].ff-623350297e7ec064e82a1d10 .fd-btn:focus {
outline: none;
}
[data-ff-el="root"].ff-623350297e7ec064e82a1d10 .fd-btn:disabled {
opacity: 0.8;
}
[data-ff-el="root"].ff-623350297e7ec064e82a1d10 .fd-form-check {
cursor: pointer;
margin: 0;
display: -webkit-box;
display: flex;
position: relative;
-webkit-box-align: center;
align-items: center;
padding-left: 30px;
}
[data-ff-el="root"].ff-623350297e7ec064e82a1d10 .fd-form-check__input {
top: 0;
left: 0;
width: 18px;
height: 18px;
opacity: 0;
z-index: -1;
position: absolute;
}
[data-ff-el="root"].ff-623350297e7ec064e82a1d10 .fd-form-check__checkmark {
top: 0;
left: 0;
width: 18px;
border: 1px solid #c4c4c4;
height: 18px;
display: block;
position: absolute;
background: #ffffff;
}
[data-ff-el="root"].ff-623350297e7ec064e82a1d10 .fd-form-check__label {
margin: 0;
font-size: 14px;
text-align: left;
word-break: break-word;
font-weight: 400;
line-height: 18px;
letter-spacing: 0.01em;
}
[data-ff-el="root"].ff-623350297e7ec064e82a1d10 .fd-form-check__input:checked+.fd-form-check__checkmark::after {
opacity: 1;
z-index: 1;
visibility: visible;
}
[data-ff-el="root"].ff-623350297e7ec064e82a1d10 .fd-form-check__checkmark::after {
top: -1px;
left: -1px;
width: 18px;
height: 18px;
content: "";
display: block;
opacity: 0;
z-index: -1;
position: absolute;
-webkit-transition: opacity 0.4s, z-index 0.4s;
transition: opacity 0.4s, z-index 0.4s;
visibility: inherit;
background-size: 12px;
background-image: url("data:image/svg+xml,%3csvg xmlns='http://www.w3.org/2000/svg' fill='black' width='12' height='10' viewBox='0 0 11.51 8.2'%3e%3ctitle%3echeck%3c/title%3e%3cpath d='M4.05%2c8.2A.74.74%2c0%2c0%2c1%2c3.52%2c8L.22%2c4.68A.75.75%2c0%2c0%2c1%2c1.28%2c3.62l3.3%2c3.3A.75.75%2c0%2c0%2c1%2c4.58%2c8%2c.74.74%2c0%2c0%2c1%2c4.05%2c8.2Z'/%3e%3cpath d='M4.06%2c8.2A.74.74%2c0%2c0%2c1%2c3.53%2c8a.75.75%2c0%2c0%2c1%2c0-1.06l6.7-6.7a.75.75%2c0%2c0%2c1%2c1.06%2c1.06L4.59%2c8A.74.74%2c0%2c0%2c1%2c4.06%2c8.2Z'/%3e%3c/svg%3e");
background-repeat: no-repeat;
background-position: center center;
}
[data-ff-el="root"].ff-623350297e7ec064e82a1d10 .fd-form-check__input:focus {
outline: none;
}
[data-ff-el="root"].ff-623350297e7ec064e82a1d10 .fd-form-content {
position: relative;
}
[data-ff-el="root"].ff-623350297e7ec064e82a1d10 .fd-has-success .fd-form-content {
display: none;
}
[data-ff-el="root"].ff-623350297e7ec064e82a1d10 .fd-has-captcha .fd-form-content>*:not(.fd-form-captcha) {
opacity: 0;
visibility: hidden;
}
[data-ff-el="root"].ff-623350297e7ec064e82a1d10 .fd-form-captcha {
top: 0;
left: 0;
width: 100%;
height: 100%;
display: -webkit-box;
display: flex;
position: absolute;
-webkit-box-align: center;
align-items: center;
-webkit-box-pack: start;
justify-content: flex-start;
}
[data-ff-el="root"].ff-623350297e7ec064e82a1d10 .fd-form-success {
display: none;
}
[data-ff-el="root"].ff-623350297e7ec064e82a1d10 .fd-has-success .fd-form-success {
display: block;
}
[data-ff-el="root"].ff-623350297e7ec064e82a1d10 .fd-form-success>*:last-child {
margin-bottom: 0;
}
[data-ff-el="root"].ff-623350297e7ec064e82a1d10 .fd-form-error {
display: none;
}
[data-ff-el="root"].ff-623350297e7ec064e82a1d10 .fd-has-error .fd-form-error {
display: block;
}
[data-ff-el="root"].ff-623350297e7ec064e82a1d10 .fd-form-error>*:last-child {
margin-bottom: 0;
}
[data-ff-el="root"].ff-623350297e7ec064e82a1d10 .fd-focus-visible,
[data-ff-el="root"].ff-623350297e7ec064e82a1d10 .fd-form-check__input.fd-focus-visible+.fd-form-check__checkmark {
outline: none;
box-shadow: 0 0 0 2px #fff, 0 0 0 6px #000 !important;
-webkit-transition: box-shadow 0.2s !important;
transition: box-shadow 0.2s !important;
}
[data-ff-el="root"].ff-623350297e7ec064e82a1d10 .fd-focus-visible,
[data-ff-el="root"].ff-623350297e7ec064e82a1d10 .fd-form-check__input.fd-focus-visible+.fd-form-check__checkmark {
outline: none;
box-shadow: 0 0 0 2px #ffffff, 0 0 0 6px #000 !important;
-webkit-transition: box-shadow 0.2s !important;
transition: box-shadow 0.2s !important;
}
[data-ff-el="root"].ff-623350297e7ec064e82a1d10 {
background: transparent;
}
[data-ff-el="root"].ff-623350297e7ec064e82a1d10 .ff-623350297e7ec064e82a1d10__container {
margin: 0 auto;
max-width: 1170px;
background: transparent;
}
[data-ff-el="root"].ff-623350297e7ec064e82a1d10 .ff-623350297e7ec064e82a1d10__form {
color: #333333;
width: 100%;
margin: 0;
font-size: 16px;
text-align: center;
font-family: Helvetica, sans-serif;
font-weight: 300;
line-height: 1.6;
letter-spacing: 0.1px;
text-transform: none;
}
@media (max-width: 767px) {
[data-ff-el="root"].ff-623350297e7ec064e82a1d10 .ff-623350297e7ec064e82a1d10__form {
word-wrap: anywhere;
word-break: break-word;
white-space: normal;
overflow-wrap: break-word;
}
}
[data-ff-el="root"].ff-623350297e7ec064e82a1d10 .ff-623350297e7ec064e82a1d10__title * {
line-height: inherit;
}
[data-ff-el="root"].ff-623350297e7ec064e82a1d10 .ff-623350297e7ec064e82a1d10__subtitle {
width: 100%;
margin: 0 0 30px;
display: block;
}
[data-ff-el="root"].ff-623350297e7ec064e82a1d10 .ff-623350297e7ec064e82a1d10__subtitle * {
line-height: inherit;
}
[data-ff-el="root"].ff-623350297e7ec064e82a1d10 .ff-623350297e7ec064e82a1d10__content {
margin: -10px -5px 0;
display: -webkit-box;
display: flex;
flex-wrap: wrap;
-webkit-box-align: start;
align-items: start;
-webkit-box-orient: horizontal;
-webkit-box-direction: normal;
flex-direction: row;
-webkit-box-pack: center;
justify-content: center;
}
@media (max-width: 767px) {
[data-ff-el="root"].ff-623350297e7ec064e82a1d10 .ff-623350297e7ec064e82a1d10__content {
display: block;
}
}
[data-ff-el="root"].ff-623350297e7ec064e82a1d10 .ff-623350297e7ec064e82a1d10__fields {
-webkit-box-flex: 0;
flex: 0 1 auto;
margin: 0px 0px 0;
display: -webkit-box;
display: flex;
flex-wrap: wrap;
max-width: -webkit-calc(100% + 10px);
max-width: calc(100% + 10px);
-webkit-box-pack: center;
justify-content: center;
}
@media (max-width: 767px) {
[data-ff-el="root"].ff-623350297e7ec064e82a1d10 .ff-623350297e7ec064e82a1d10__fields {
display: block;
}
}
[data-ff-el="root"].ff-623350297e7ec064e82a1d10 .ff-623350297e7ec064e82a1d10__field {
-webkit-box-flex: 1;
flex: 1 1;
margin: 10px 5px 0;
font-size: 13px;
max-width: 400px;
min-width: 200px;
text-align: left;
font-family: Helvetica, sans-serif;
font-weight: 400;
letter-spacing: 0.1px;
}
@media (max-width: 767px) {
[data-ff-el="root"].ff-623350297e7ec064e82a1d10 .ff-623350297e7ec064e82a1d10__field {
max-width: -webkit-calc(100% - 10px);
max-width: calc(100% - 10px);
}
}
[data-ff-el="root"].ff-623350297e7ec064e82a1d10 .ff-623350297e7ec064e82a1d10__control {
color: #000000;
border: 1px solid #dddddd;
height: 46px;
padding: 12px 20px;
font-size: 13px;
background: #ffffff;
text-align: left;
font-family: Helvetica, sans-serif;
font-weight: 400;
line-height: 20px;
border-radius: 0px;
letter-spacing: 0.1px;
text-transform: none;
}
[data-ff-el="root"].ff-623350297e7ec064e82a1d10 .ff-623350297e7ec064e82a1d10__label {
color: #000000;
border: 1px solid transparent;
padding: 12px 20px;
font-size: 13px;
text-align: left;
font-family: Helvetica, sans-serif;
font-weight: 400;
line-height: 20px;
letter-spacing: 0.1px;
text-transform: none;
}
[data-ff-el="root"].ff-623350297e7ec064e82a1d10 .ff-623350297e7ec064e82a1d10__preference {
margin: 30px 5px 0;
display: -webkit-box;
display: flex;
-webkit-box-orient: vertical;
-webkit-box-direction: normal;
flex-direction: column;
}
[data-ff-el="root"].ff-623350297e7ec064e82a1d10 .ff-623350297e7ec064e82a1d10__preference-title {
color: #333333;
width: 100%;
margin: 0 0 30px;
display: block;
font-size: 18px;
text-align: center;
font-family: Helvetica, sans-serif;
font-weight: 700;
line-height: 1.4;
letter-spacing: 0px;
text-transform: none;
}
[data-ff-el="root"].ff-623350297e7ec064e82a1d10 .ff-623350297e7ec064e82a1d10__preference-title * {
line-height: inherit;
}
[data-ff-el="root"].ff-623350297e7ec064e82a1d10 .ff-623350297e7ec064e82a1d10__preference-control {
width: 100%;
}
[data-ff-el="root"].ff-623350297e7ec064e82a1d10 .ff-623350297e7ec064e82a1d10__preference-list {
width: -webkit-calc(100% + 24px);
width: calc(100% + 24px);
margin: -8px -12px;
display: -webkit-box;
display: flex;
flex-wrap: wrap;
-webkit-box-pack: start;
justify-content: flex-start;
}
@media (max-width: 767px) {
[data-ff-el="root"].ff-623350297e7ec064e82a1d10 .ff-623350297e7ec064e82a1d10__preference-list {
display: block;
}
}
[data-ff-el="root"].ff-623350297e7ec064e82a1d10 .ff-623350297e7ec064e82a1d10__preference-item {
-webkit-box-flex: 0;
flex: 0 0 33.333333333333336%;
padding: 8px 12px;
}
[data-ff-el="root"].ff-623350297e7ec064e82a1d10 .ff-623350297e7ec064e82a1d10__form-check .fd-form-check__input {
top: 2.200000000000001px;
}
[data-ff-el="root"].ff-623350297e7ec064e82a1d10 .ff-623350297e7ec064e82a1d10__form-check .fd-form-check__checkmark {
top: 2.200000000000001px;
border-radius: 3px;
}
[data-ff-el="root"].ff-623350297e7ec064e82a1d10 .ff-623350297e7ec064e82a1d10__form-check .fd-form-check__label {
color: #333333;
font-size: 14px;
min-height: 22.400000000000002px;
font-family: Helvetica, sans-serif;
font-weight: 400;
line-height: 1.6;
letter-spacing: 0px;
text-transform: none;
}
[data-ff-el="root"].ff-623350297e7ec064e82a1d10 .ff-623350297e7ec064e82a1d10__form-check .fd-form-check__checkmark::after {
background-size: 12px;
background-image: url("data:image/svg+xml,%3csvg xmlns='http://www.w3.org/2000/svg' fill='black' width='12' height='10' viewBox='0 0 11.51 8.2'%3e%3ctitle%3echeck%3c/title%3e%3cpath d='M4.05%2c8.2A.74.74%2c0%2c0%2c1%2c3.52%2c8L.22%2c4.68A.75.75%2c0%2c0%2c1%2c1.28%2c3.62l3.3%2c3.3A.75.75%2c0%2c0%2c1%2c4.58%2c8%2c.74.74%2c0%2c0%2c1%2c4.05%2c8.2Z'/%3e%3cpath d='M4.06%2c8.2A.74.74%2c0%2c0%2c1%2c3.53%2c8a.75.75%2c0%2c0%2c1%2c0-1.06l6.7-6.7a.75.75%2c0%2c0%2c1%2c1.06%2c1.06L4.59%2c8A.74.74%2c0%2c0%2c1%2c4.06%2c8.2Z'/%3e%3c/svg%3e");
}
[data-ff-el="root"].ff-623350297e7ec064e82a1d10 .ff-623350297e7ec064e82a1d10__footer {
-webkit-box-flex: 0;
flex: 1;
margin-top: 10px;
text-align: center;
margin-left: 5px;
margin-right: 5px;
}
@media (max-width: 767px) {
[data-ff-el="root"].ff-623350297e7ec064e82a1d10 .ff-623350297e7ec064e82a1d10__footer {
margin-top: 25px;
}
}
[data-ff-el="root"].ff-623350297e7ec064e82a1d10 .ff-623350297e7ec064e82a1d10__button {
color: #000000;
border: 1px solid #ffd253;
display: inline-block;
padding: 12px 20px;
font-size: 13px;
background: #ffd253;
text-align: center;
font-family: Helvetica, sans-serif;
font-weight: 700;
line-height: 20px;
white-space: nowrap;
border-radius: 0px;
letter-spacing: 0.8px;
text-transform: uppercase;
width: 100%;
display: block;
}
[data-ff-el="root"].ff-623350297e7ec064e82a1d10 .ff-623350297e7ec064e82a1d10__error {
margin: 10px 0 0 0;
}
(function(w, d, t, h, s, n) {
w.FlodeskObject = n;
var fn = function() {
(w[n].q = w[n].q || []).push(arguments);
};
w[n] = w[n] || fn;
var f = d.getElementsByTagName(t)[0];
var v = '?v=' + Math.floor(new Date().getTime() / (120 * 1000)) * 60;
var sm = d.createElement(t);
sm.async = true;
sm.type = 'module';
sm.src = h + s + '.mjs' + v;
f.parentNode.insertBefore(sm, f);
var sn = d.createElement(t);
sn.async = true;
sn.noModule = true;
sn.src = h + s + '.js' + v;
f.parentNode.insertBefore(sn, f);
})(window, document, 'script', 'https://assets.flodesk.com', '/universal', 'fd');
window.fd('form:handle', {
formId: '623350297e7ec064e82a1d10',
rootEl: '.ff-623350297e7ec064e82a1d10',
});
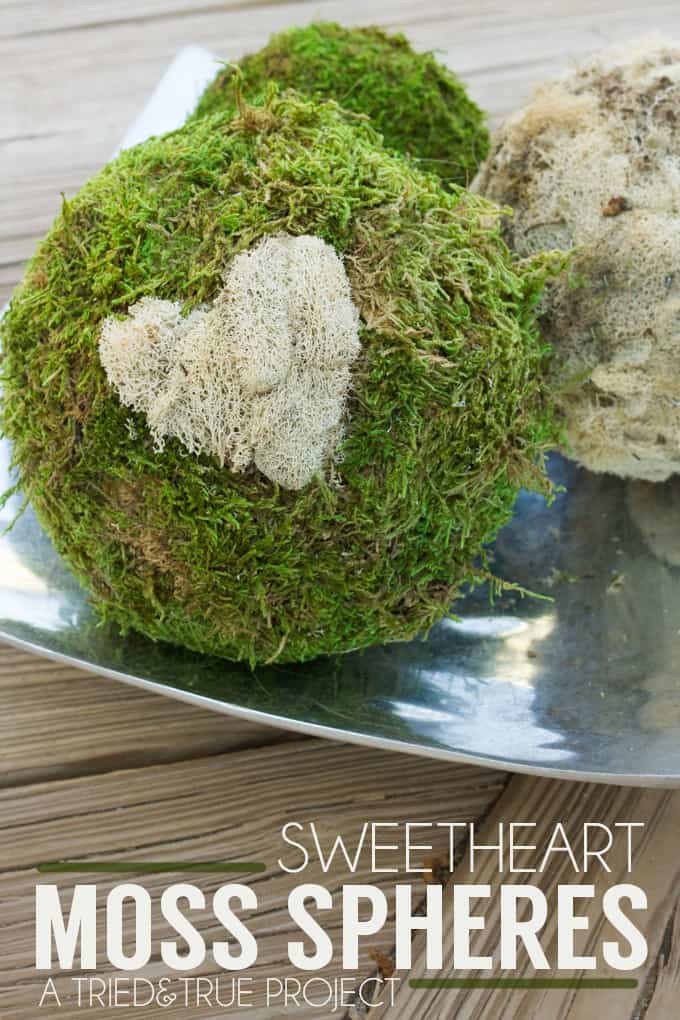 I gotta tell you, I’m kinda the worst at having decorative elements on display in my house. My kids are both so little that nothing spherical-shaped is safe in this house! Right now these cute Sweetheart Moss Spheres are safe on our dining room table but I dream of the day when I can leave them out, undisturbed, in our living room. No, I take that back, these boys are already growing up too fast for this mama’s heart. Dining room table it is!
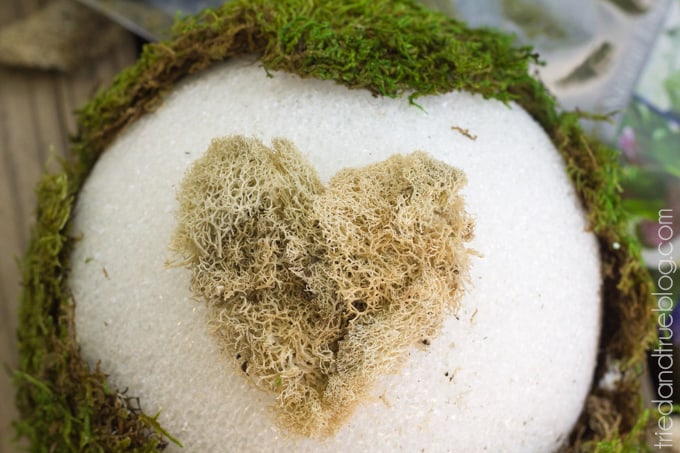 This post may contain affiliate links. The small percentage I may earn off your purchase comes at no extra cost to you and helps T&T continue to offer free printables and tutorials!
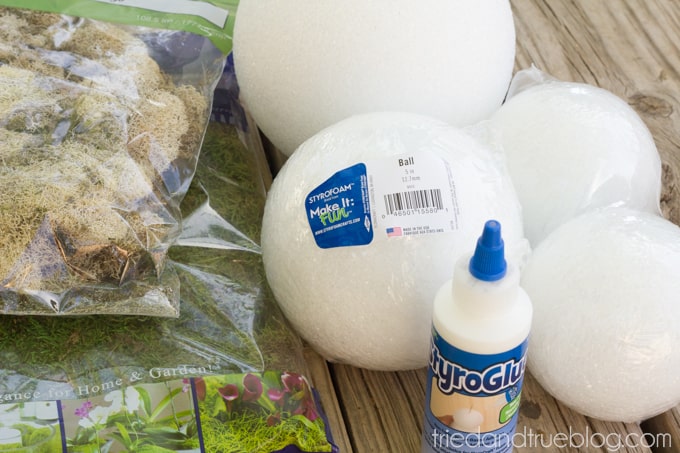 Step Two. Tear off a palm-sized sections of the moss and apply to the largest sphere. The glue is really thick so you don’t have to worry about it sliding down the ball too much. You can either hold in place with your hand while it dries for a few minute or if you’re impatient like I am, insert a few floral pins and move on to the next section. (Hint: If you spread apart the moss slightly and push the pin under the top layer of moss, you’ll hardly see them at all and can just leave them in!)
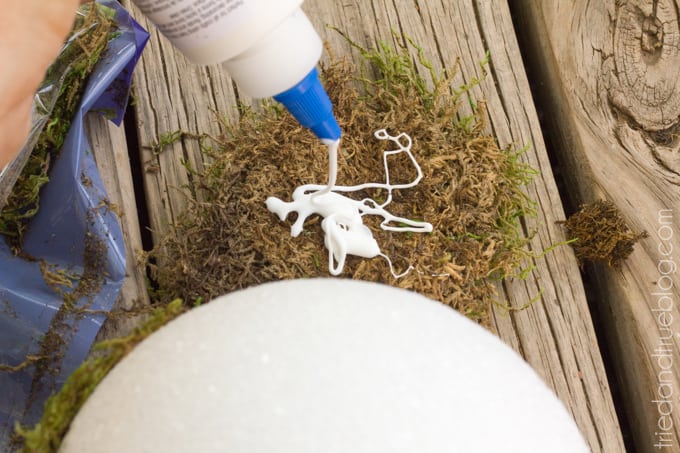 Step Three. Continue adding green moss until the majority of the ball is covered, leaving a large open space for the heart detail.
 Step Four. Begin creating a heart shape with small clumps of the preserved white reindeer moss. Because it was such a small area, the heart stayed together with just glue. Fill in the remaining white space with green moss until covered. Allow to dry completely before showing off in a display!
 Tons of Options
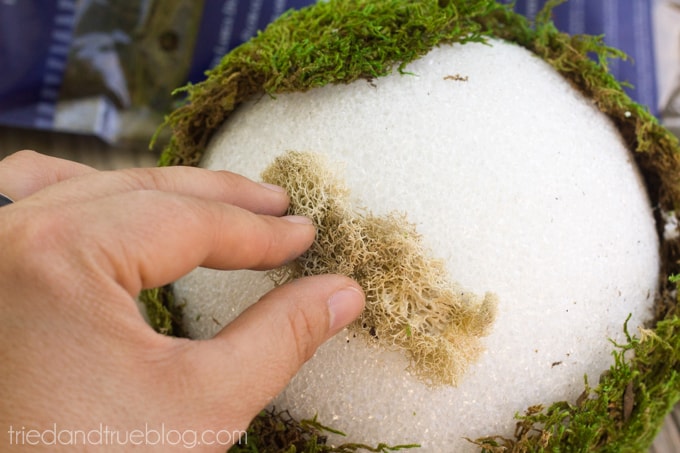 Tons of Options
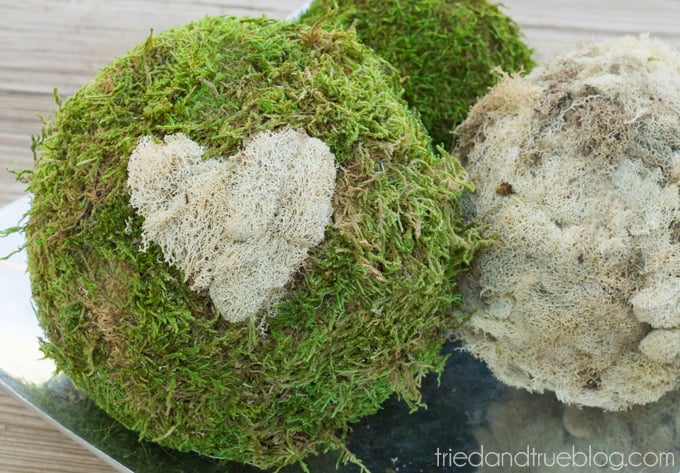


Comments & Reviews
Sharon says
A moss heart — I love it! What a sweet twist on a moss ball. Thank you!
Vanessa Brady says
Thanks so much! I love how it’s a serious looking moss ball and then bam….fun!
mgj says
Looks easy thanks
Vanessa Brady says
Thanks!
Beverly {Flamingo Toes} says
These are so sweet Vanessa! I love the little heart on there – what a cute idea!
Vanessa Brady says
Thanks, Bev! When in doubt, add a heart! 😀
Tiffany says
Hi, Vanessa ~ I’m visiting from the Hit Me with Your Best Shot link party. I love this new take on moss spheres! I’m obsessed with spheres of any kind right now, and I’m really excited about creating a few of my own. Thanks for the inspiration!
Vanessa Brady says
Hi Tiffany, thanks for visiting! I’m kinda crazy about spheres right now too!
Amy Anderson says
The little hearts are a perfect touch!
Vanessa Brady says
Thanks, Amy!
laurakellywalters says
I love these! This is a great way to create something beautiful with love in the center.
Vanessa Brady says
It’s all about love, right?!
Christine says
Simply adorbs,,,,pinning
Vanessa Brady says
Thanks so much!