Subscribe to the newsletter for all the latest crafts + access to the creative library!
[data-ff-el="root"].ff-623350297e7ec064e82a1d10 *,
[data-ff-el="root"].ff-623350297e7ec064e82a1d10 *::before,
[data-ff-el="root"].ff-623350297e7ec064e82a1d10 *::after {
box-sizing: border-box;
}
[data-ff-el="root"].ff-623350297e7ec064e82a1d10 [tabindex="-1"]:focus {
outline: none !important;
}
[data-ff-el="root"].ff-623350297e7ec064e82a1d10 h1,
[data-ff-el="root"].ff-623350297e7ec064e82a1d10 h2,
[data-ff-el="root"].ff-623350297e7ec064e82a1d10 h3,
[data-ff-el="root"].ff-623350297e7ec064e82a1d10 h4,
[data-ff-el="root"].ff-623350297e7ec064e82a1d10 h5,
[data-ff-el="root"].ff-623350297e7ec064e82a1d10 h6 {
margin-top: 0;
margin-bottom: 0.7em;
}
[data-ff-el="root"].ff-623350297e7ec064e82a1d10 p {
margin-top: 0;
margin-bottom: 1rem;
}
[data-ff-el="root"].ff-623350297e7ec064e82a1d10 ol,
[data-ff-el="root"].ff-623350297e7ec064e82a1d10 ul,
[data-ff-el="root"].ff-623350297e7ec064e82a1d10 dl {
margin-top: 0;
margin-bottom: 1.4rem;
}
[data-ff-el="root"].ff-623350297e7ec064e82a1d10 ol ol,
[data-ff-el="root"].ff-623350297e7ec064e82a1d10 ul ul,
[data-ff-el="root"].ff-623350297e7ec064e82a1d10 ol ul,
[data-ff-el="root"].ff-623350297e7ec064e82a1d10 ul ol {
margin-bottom: 0;
}
[data-ff-el="root"].ff-623350297e7ec064e82a1d10 b,
[data-ff-el="root"].ff-623350297e7ec064e82a1d10 strong {
font-weight: bolder;
}
[data-ff-el="root"].ff-623350297e7ec064e82a1d10 small {
font-size: 80%;
}
[data-ff-el="root"].ff-623350297e7ec064e82a1d10 sub,
[data-ff-el="root"].ff-623350297e7ec064e82a1d10 sup {
position: relative;
font-size: 75%;
line-height: 0;
vertical-align: baseline;
}
[data-ff-el="root"].ff-623350297e7ec064e82a1d10 sub {
bottom: -0.25em;
}
[data-ff-el="root"].ff-623350297e7ec064e82a1d10 sup {
top: -0.5em;
}
[data-ff-el="root"].ff-623350297e7ec064e82a1d10 {
color: #000000;
text-decoration: none;
background-color: transparent;
-webkit-text-decoration-skip: objects;
}
[data-ff-el="root"].ff-623350297e7ec064e82a1d10 a:hover {
color: #4396fd;
text-decoration: none;
}
[data-ff-el="root"].ff-623350297e7ec064e82a1d10 img {
border-style: none;
vertical-align: middle;
}
[data-ff-el="root"].ff-623350297e7ec064e82a1d10 svg:not(:root) {
overflow: hidden;
}
[data-ff-el="root"].ff-623350297e7ec064e82a1d10,
[data-ff-el="root"].ff-623350297e7ec064e82a1d10 area,
[data-ff-el="root"].ff-623350297e7ec064e82a1d10 button,
[data-ff-el="root"].ff-623350297e7ec064e82a1d10 [role="button"],
[data-ff-el="root"].ff-623350297e7ec064e82a1d10 input,
[data-ff-el="root"].ff-623350297e7ec064e82a1d10 label,
[data-ff-el="root"].ff-623350297e7ec064e82a1d10 select,
[data-ff-el="root"].ff-623350297e7ec064e82a1d10 summary,
[data-ff-el="root"].ff-623350297e7ec064e82a1d10 textarea {
touch-action: manipulation;
}
[data-ff-el="root"].ff-623350297e7ec064e82a1d10 label {
display: inline-block;
font-weight: bolder;
margin-bottom: 0.7rem;
}
[data-ff-el="root"].ff-623350297e7ec064e82a1d10 button:focus {
outline: 1px dotted;
}
[data-ff-el="root"].ff-623350297e7ec064e82a1d10 input,
[data-ff-el="root"].ff-623350297e7ec064e82a1d10 button,
[data-ff-el="root"].ff-623350297e7ec064e82a1d10 select,
[data-ff-el="root"].ff-623350297e7ec064e82a1d10 optgroup,
[data-ff-el="root"].ff-623350297e7ec064e82a1d10 textarea {
margin: 0;
font-size: inherit;
font-family: inherit;
line-height: inherit;
}
[data-ff-el="root"].ff-623350297e7ec064e82a1d10 button,
[data-ff-el="root"].ff-623350297e7ec064e82a1d10 input {
overflow: visible;
}
[data-ff-el="root"].ff-623350297e7ec064e82a1d10 button,
[data-ff-el="root"].ff-623350297e7ec064e82a1d10 select {
text-transform: none;
}
[data-ff-el="root"].ff-623350297e7ec064e82a1d10 button,
html[data-ff-el="root"].ff-623350297e7ec064e82a1d10 [type="button"],
[data-ff-el="root"].ff-623350297e7ec064e82a1d10 [type="reset"],
[data-ff-el="root"].ff-623350297e7ec064e82a1d10 [type="submit"] {
-webkit-appearance: button;
}
[data-ff-el="root"].ff-623350297e7ec064e82a1d10 button::-moz-focus-inner,
[data-ff-el="root"].ff-623350297e7ec064e82a1d10 [type="button"]::-moz-focus-inner,
[data-ff-el="root"].ff-623350297e7ec064e82a1d10 [type="reset"]::-moz-focus-inner,
[data-ff-el="root"].ff-623350297e7ec064e82a1d10 [type="submit"]::-moz-focus-inner {
padding: 0;
border-style: none;
}
[data-ff-el="root"].ff-623350297e7ec064e82a1d10 input[type="radio"],
[data-ff-el="root"].ff-623350297e7ec064e82a1d10 input[type="checkbox"] {
padding: 0;
box-sizing: border-box;
}
[data-ff-el="root"].ff-623350297e7ec064e82a1d10 input[type="date"],
[data-ff-el="root"].ff-623350297e7ec064e82a1d10 input[type="time"],
[data-ff-el="root"].ff-623350297e7ec064e82a1d10 input[type="datetime-local"],
[data-ff-el="root"].ff-623350297e7ec064e82a1d10 input[type="month"] {
-webkit-appearance: listbox;
}
[data-ff-el="root"].ff-623350297e7ec064e82a1d10 textarea {
resize: vertical;
overflow: auto;
}
[data-ff-el="root"].ff-623350297e7ec064e82a1d10 [type="number"]::-webkit-inner-spin-button,
[data-ff-el="root"].ff-623350297e7ec064e82a1d10 [type="number"]::-webkit-outer-spin-button {
height: auto;
}
[data-ff-el="root"].ff-623350297e7ec064e82a1d10 [type="search"] {
outline-offset: -2px;
-webkit-appearance: none;
}
[data-ff-el="root"].ff-623350297e7ec064e82a1d10 [type="search"]::-webkit-search-cancel-button,
[data-ff-el="root"].ff-623350297e7ec064e82a1d10 [type="search"]::-webkit-search-decoration {
-webkit-appearance: none;
}
[data-ff-el="root"].ff-623350297e7ec064e82a1d10 ::-webkit-file-upload-button {
font: inherit;
-webkit-appearance: button;
}
[data-ff-el="root"].ff-623350297e7ec064e82a1d10 [hidden] {
display: none !important;
}
[data-ff-el="root"].ff-623350297e7ec064e82a1d10 .fd-form-control {
width: 100%;
display: block;
outline: none;
position: relative;
-webkit-appearance: none;
}
[data-ff-el="root"].ff-623350297e7ec064e82a1d10 .fd-form-control:focus {
outline: none;
}
[data-ff-el="root"].ff-623350297e7ec064e82a1d10 .fd-form-control::-webkit-input-placeholder {
color: transparent !important;
opacity: 0 !important;
}
[data-ff-el="root"].ff-623350297e7ec064e82a1d10 .fd-form-control::-moz-placeholder {
color: transparent !important;
opacity: 0 !important;
}
[data-ff-el="root"].ff-623350297e7ec064e82a1d10 .fd-form-control:-ms-input-placeholder {
color: transparent !important;
opacity: 0 !important;
}
[data-ff-el="root"].ff-623350297e7ec064e82a1d10 .fd-form-control::placeholder {
color: transparent !important;
opacity: 0 !important;
}
[data-ff-el="root"].ff-623350297e7ec064e82a1d10 .fd-form-label {
top: 0;
left: 0;
right: 0;
margin: 0;
overflow: hidden;
position: absolute;
white-space: nowrap;
text-overflow: ellipsis;
pointer-events: none;
}
[data-ff-el="root"].ff-623350297e7ec064e82a1d10 .fd-form-control:not(:-moz-placeholder-shown)+.fd-form-label {
opacity: 0;
}
[data-ff-el="root"].ff-623350297e7ec064e82a1d10 .fd-form-control:not(:-ms-input-placeholder)+.fd-form-label {
opacity: 0;
}
[data-ff-el="root"].ff-623350297e7ec064e82a1d10 .fd-form-control:not(:placeholder-shown)+.fd-form-label {
opacity: 0;
}
[data-ff-el="root"].ff-623350297e7ec064e82a1d10 .fd-form-description {
margin: 5px 0 0 0;
font-size: 0.8em;
}
[data-ff-el="root"].ff-623350297e7ec064e82a1d10 .fd-form-feedback {
margin: 5px 0 0 0;
font-size: 0.8em;
}
[data-ff-el="root"].ff-623350297e7ec064e82a1d10 .fd-form-group {
margin: 0 0 15px;
position: relative;
}
[data-ff-el="root"].ff-623350297e7ec064e82a1d10 .fd-form-group.fd-has-success .fd-form-feedback,
[data-ff-el="root"].ff-623350297e7ec064e82a1d10 .fd-form-group.fd-has-success .fd-form-check {
color: #02dba8 !important;
}
[data-ff-el="root"].ff-623350297e7ec064e82a1d10 .fd-form-group.fd-has-success .fd-form-control {
color: #02dba8 !important;
border-color: #02dba8 !important;
}
[data-ff-el="root"].ff-623350297e7ec064e82a1d10 .fd-form-group.fd-has-success .fd-form-feedback {
display: block;
}
[data-ff-el="root"].ff-623350297e7ec064e82a1d10 .fd-form-group.fd-has-error .fd-form-feedback,
[data-ff-el="root"].ff-623350297e7ec064e82a1d10 .fd-form-group.fd-has-error .fd-form-check {
color: #eb3d3b !important;
}
[data-ff-el="root"].ff-623350297e7ec064e82a1d10 .fd-form-group.fd-has-error .fd-form-control {
color: #eb3d3b !important;
border-color: #eb3d3b !important;
}
[data-ff-el="root"].ff-623350297e7ec064e82a1d10 .fd-form-group.fd-has-error .fd-form-feedback {
display: block;
}
[data-ff-el="root"].ff-623350297e7ec064e82a1d10 .fd-btn {
cursor: pointer;
display: -webkit-inline-box;
display: inline-flex;
outline: none;
max-width: 100%;
font-style: normal;
text-align: center;
-webkit-box-align: center;
align-items: center;
text-shadow: none;
white-space: normal;
-webkit-box-pack: center;
justify-content: center;
text-decoration: none;
}
[data-ff-el="root"].ff-623350297e7ec064e82a1d10 .fd-btn:hover {
outline: none;
}
[data-ff-el="root"].ff-623350297e7ec064e82a1d10 .fd-btn:focus {
outline: none;
}
[data-ff-el="root"].ff-623350297e7ec064e82a1d10 .fd-btn:disabled {
opacity: 0.8;
}
[data-ff-el="root"].ff-623350297e7ec064e82a1d10 .fd-form-check {
cursor: pointer;
margin: 0;
display: -webkit-box;
display: flex;
position: relative;
-webkit-box-align: center;
align-items: center;
padding-left: 30px;
}
[data-ff-el="root"].ff-623350297e7ec064e82a1d10 .fd-form-check__input {
top: 0;
left: 0;
width: 18px;
height: 18px;
opacity: 0;
z-index: -1;
position: absolute;
}
[data-ff-el="root"].ff-623350297e7ec064e82a1d10 .fd-form-check__checkmark {
top: 0;
left: 0;
width: 18px;
border: 1px solid #c4c4c4;
height: 18px;
display: block;
position: absolute;
background: #ffffff;
}
[data-ff-el="root"].ff-623350297e7ec064e82a1d10 .fd-form-check__label {
margin: 0;
font-size: 14px;
text-align: left;
word-break: break-word;
font-weight: 400;
line-height: 18px;
letter-spacing: 0.01em;
}
[data-ff-el="root"].ff-623350297e7ec064e82a1d10 .fd-form-check__input:checked+.fd-form-check__checkmark::after {
opacity: 1;
z-index: 1;
visibility: visible;
}
[data-ff-el="root"].ff-623350297e7ec064e82a1d10 .fd-form-check__checkmark::after {
top: -1px;
left: -1px;
width: 18px;
height: 18px;
content: "";
display: block;
opacity: 0;
z-index: -1;
position: absolute;
-webkit-transition: opacity 0.4s, z-index 0.4s;
transition: opacity 0.4s, z-index 0.4s;
visibility: inherit;
background-size: 12px;
background-image: url("data:image/svg+xml,%3csvg xmlns='http://www.w3.org/2000/svg' fill='black' width='12' height='10' viewBox='0 0 11.51 8.2'%3e%3ctitle%3echeck%3c/title%3e%3cpath d='M4.05%2c8.2A.74.74%2c0%2c0%2c1%2c3.52%2c8L.22%2c4.68A.75.75%2c0%2c0%2c1%2c1.28%2c3.62l3.3%2c3.3A.75.75%2c0%2c0%2c1%2c4.58%2c8%2c.74.74%2c0%2c0%2c1%2c4.05%2c8.2Z'/%3e%3cpath d='M4.06%2c8.2A.74.74%2c0%2c0%2c1%2c3.53%2c8a.75.75%2c0%2c0%2c1%2c0-1.06l6.7-6.7a.75.75%2c0%2c0%2c1%2c1.06%2c1.06L4.59%2c8A.74.74%2c0%2c0%2c1%2c4.06%2c8.2Z'/%3e%3c/svg%3e");
background-repeat: no-repeat;
background-position: center center;
}
[data-ff-el="root"].ff-623350297e7ec064e82a1d10 .fd-form-check__input:focus {
outline: none;
}
[data-ff-el="root"].ff-623350297e7ec064e82a1d10 .fd-form-content {
position: relative;
}
[data-ff-el="root"].ff-623350297e7ec064e82a1d10 .fd-has-success .fd-form-content {
display: none;
}
[data-ff-el="root"].ff-623350297e7ec064e82a1d10 .fd-has-captcha .fd-form-content>*:not(.fd-form-captcha) {
opacity: 0;
visibility: hidden;
}
[data-ff-el="root"].ff-623350297e7ec064e82a1d10 .fd-form-captcha {
top: 0;
left: 0;
width: 100%;
height: 100%;
display: -webkit-box;
display: flex;
position: absolute;
-webkit-box-align: center;
align-items: center;
-webkit-box-pack: start;
justify-content: flex-start;
}
[data-ff-el="root"].ff-623350297e7ec064e82a1d10 .fd-form-success {
display: none;
}
[data-ff-el="root"].ff-623350297e7ec064e82a1d10 .fd-has-success .fd-form-success {
display: block;
}
[data-ff-el="root"].ff-623350297e7ec064e82a1d10 .fd-form-success>*:last-child {
margin-bottom: 0;
}
[data-ff-el="root"].ff-623350297e7ec064e82a1d10 .fd-form-error {
display: none;
}
[data-ff-el="root"].ff-623350297e7ec064e82a1d10 .fd-has-error .fd-form-error {
display: block;
}
[data-ff-el="root"].ff-623350297e7ec064e82a1d10 .fd-form-error>*:last-child {
margin-bottom: 0;
}
[data-ff-el="root"].ff-623350297e7ec064e82a1d10 .fd-focus-visible,
[data-ff-el="root"].ff-623350297e7ec064e82a1d10 .fd-form-check__input.fd-focus-visible+.fd-form-check__checkmark {
outline: none;
box-shadow: 0 0 0 2px #fff, 0 0 0 6px #000 !important;
-webkit-transition: box-shadow 0.2s !important;
transition: box-shadow 0.2s !important;
}
[data-ff-el="root"].ff-623350297e7ec064e82a1d10 .fd-focus-visible,
[data-ff-el="root"].ff-623350297e7ec064e82a1d10 .fd-form-check__input.fd-focus-visible+.fd-form-check__checkmark {
outline: none;
box-shadow: 0 0 0 2px #ffffff, 0 0 0 6px #000 !important;
-webkit-transition: box-shadow 0.2s !important;
transition: box-shadow 0.2s !important;
}
[data-ff-el="root"].ff-623350297e7ec064e82a1d10 {
background: transparent;
}
[data-ff-el="root"].ff-623350297e7ec064e82a1d10 .ff-623350297e7ec064e82a1d10__container {
margin: 0 auto;
max-width: 1170px;
background: transparent;
}
[data-ff-el="root"].ff-623350297e7ec064e82a1d10 .ff-623350297e7ec064e82a1d10__form {
color: #333333;
width: 100%;
margin: 0;
font-size: 16px;
text-align: center;
font-family: Helvetica, sans-serif;
font-weight: 300;
line-height: 1.6;
letter-spacing: 0.1px;
text-transform: none;
}
@media (max-width: 767px) {
[data-ff-el="root"].ff-623350297e7ec064e82a1d10 .ff-623350297e7ec064e82a1d10__form {
word-wrap: anywhere;
word-break: break-word;
white-space: normal;
overflow-wrap: break-word;
}
}
[data-ff-el="root"].ff-623350297e7ec064e82a1d10 .ff-623350297e7ec064e82a1d10__title * {
line-height: inherit;
}
[data-ff-el="root"].ff-623350297e7ec064e82a1d10 .ff-623350297e7ec064e82a1d10__subtitle {
width: 100%;
margin: 0 0 30px;
display: block;
}
[data-ff-el="root"].ff-623350297e7ec064e82a1d10 .ff-623350297e7ec064e82a1d10__subtitle * {
line-height: inherit;
}
[data-ff-el="root"].ff-623350297e7ec064e82a1d10 .ff-623350297e7ec064e82a1d10__content {
margin: -10px -5px 0;
display: -webkit-box;
display: flex;
flex-wrap: wrap;
-webkit-box-align: start;
align-items: start;
-webkit-box-orient: horizontal;
-webkit-box-direction: normal;
flex-direction: row;
-webkit-box-pack: center;
justify-content: center;
}
@media (max-width: 767px) {
[data-ff-el="root"].ff-623350297e7ec064e82a1d10 .ff-623350297e7ec064e82a1d10__content {
display: block;
}
}
[data-ff-el="root"].ff-623350297e7ec064e82a1d10 .ff-623350297e7ec064e82a1d10__fields {
-webkit-box-flex: 0;
flex: 0 1 auto;
margin: 0px 0px 0;
display: -webkit-box;
display: flex;
flex-wrap: wrap;
max-width: -webkit-calc(100% + 10px);
max-width: calc(100% + 10px);
-webkit-box-pack: center;
justify-content: center;
}
@media (max-width: 767px) {
[data-ff-el="root"].ff-623350297e7ec064e82a1d10 .ff-623350297e7ec064e82a1d10__fields {
display: block;
}
}
[data-ff-el="root"].ff-623350297e7ec064e82a1d10 .ff-623350297e7ec064e82a1d10__field {
-webkit-box-flex: 1;
flex: 1 1;
margin: 10px 5px 0;
font-size: 13px;
max-width: 400px;
min-width: 200px;
text-align: left;
font-family: Helvetica, sans-serif;
font-weight: 400;
letter-spacing: 0.1px;
}
@media (max-width: 767px) {
[data-ff-el="root"].ff-623350297e7ec064e82a1d10 .ff-623350297e7ec064e82a1d10__field {
max-width: -webkit-calc(100% - 10px);
max-width: calc(100% - 10px);
}
}
[data-ff-el="root"].ff-623350297e7ec064e82a1d10 .ff-623350297e7ec064e82a1d10__control {
color: #000000;
border: 1px solid #dddddd;
height: 46px;
padding: 12px 20px;
font-size: 13px;
background: #ffffff;
text-align: left;
font-family: Helvetica, sans-serif;
font-weight: 400;
line-height: 20px;
border-radius: 0px;
letter-spacing: 0.1px;
text-transform: none;
}
[data-ff-el="root"].ff-623350297e7ec064e82a1d10 .ff-623350297e7ec064e82a1d10__label {
color: #000000;
border: 1px solid transparent;
padding: 12px 20px;
font-size: 13px;
text-align: left;
font-family: Helvetica, sans-serif;
font-weight: 400;
line-height: 20px;
letter-spacing: 0.1px;
text-transform: none;
}
[data-ff-el="root"].ff-623350297e7ec064e82a1d10 .ff-623350297e7ec064e82a1d10__preference {
margin: 30px 5px 0;
display: -webkit-box;
display: flex;
-webkit-box-orient: vertical;
-webkit-box-direction: normal;
flex-direction: column;
}
[data-ff-el="root"].ff-623350297e7ec064e82a1d10 .ff-623350297e7ec064e82a1d10__preference-title {
color: #333333;
width: 100%;
margin: 0 0 30px;
display: block;
font-size: 18px;
text-align: center;
font-family: Helvetica, sans-serif;
font-weight: 700;
line-height: 1.4;
letter-spacing: 0px;
text-transform: none;
}
[data-ff-el="root"].ff-623350297e7ec064e82a1d10 .ff-623350297e7ec064e82a1d10__preference-title * {
line-height: inherit;
}
[data-ff-el="root"].ff-623350297e7ec064e82a1d10 .ff-623350297e7ec064e82a1d10__preference-control {
width: 100%;
}
[data-ff-el="root"].ff-623350297e7ec064e82a1d10 .ff-623350297e7ec064e82a1d10__preference-list {
width: -webkit-calc(100% + 24px);
width: calc(100% + 24px);
margin: -8px -12px;
display: -webkit-box;
display: flex;
flex-wrap: wrap;
-webkit-box-pack: start;
justify-content: flex-start;
}
@media (max-width: 767px) {
[data-ff-el="root"].ff-623350297e7ec064e82a1d10 .ff-623350297e7ec064e82a1d10__preference-list {
display: block;
}
}
[data-ff-el="root"].ff-623350297e7ec064e82a1d10 .ff-623350297e7ec064e82a1d10__preference-item {
-webkit-box-flex: 0;
flex: 0 0 33.333333333333336%;
padding: 8px 12px;
}
[data-ff-el="root"].ff-623350297e7ec064e82a1d10 .ff-623350297e7ec064e82a1d10__form-check .fd-form-check__input {
top: 2.200000000000001px;
}
[data-ff-el="root"].ff-623350297e7ec064e82a1d10 .ff-623350297e7ec064e82a1d10__form-check .fd-form-check__checkmark {
top: 2.200000000000001px;
border-radius: 3px;
}
[data-ff-el="root"].ff-623350297e7ec064e82a1d10 .ff-623350297e7ec064e82a1d10__form-check .fd-form-check__label {
color: #333333;
font-size: 14px;
min-height: 22.400000000000002px;
font-family: Helvetica, sans-serif;
font-weight: 400;
line-height: 1.6;
letter-spacing: 0px;
text-transform: none;
}
[data-ff-el="root"].ff-623350297e7ec064e82a1d10 .ff-623350297e7ec064e82a1d10__form-check .fd-form-check__checkmark::after {
background-size: 12px;
background-image: url("data:image/svg+xml,%3csvg xmlns='http://www.w3.org/2000/svg' fill='black' width='12' height='10' viewBox='0 0 11.51 8.2'%3e%3ctitle%3echeck%3c/title%3e%3cpath d='M4.05%2c8.2A.74.74%2c0%2c0%2c1%2c3.52%2c8L.22%2c4.68A.75.75%2c0%2c0%2c1%2c1.28%2c3.62l3.3%2c3.3A.75.75%2c0%2c0%2c1%2c4.58%2c8%2c.74.74%2c0%2c0%2c1%2c4.05%2c8.2Z'/%3e%3cpath d='M4.06%2c8.2A.74.74%2c0%2c0%2c1%2c3.53%2c8a.75.75%2c0%2c0%2c1%2c0-1.06l6.7-6.7a.75.75%2c0%2c0%2c1%2c1.06%2c1.06L4.59%2c8A.74.74%2c0%2c0%2c1%2c4.06%2c8.2Z'/%3e%3c/svg%3e");
}
[data-ff-el="root"].ff-623350297e7ec064e82a1d10 .ff-623350297e7ec064e82a1d10__footer {
-webkit-box-flex: 0;
flex: 1;
margin-top: 10px;
text-align: center;
margin-left: 5px;
margin-right: 5px;
}
@media (max-width: 767px) {
[data-ff-el="root"].ff-623350297e7ec064e82a1d10 .ff-623350297e7ec064e82a1d10__footer {
margin-top: 25px;
}
}
[data-ff-el="root"].ff-623350297e7ec064e82a1d10 .ff-623350297e7ec064e82a1d10__button {
color: #000000;
border: 1px solid #ffd253;
display: inline-block;
padding: 12px 20px;
font-size: 13px;
background: #ffd253;
text-align: center;
font-family: Helvetica, sans-serif;
font-weight: 700;
line-height: 20px;
white-space: nowrap;
border-radius: 0px;
letter-spacing: 0.8px;
text-transform: uppercase;
width: 100%;
display: block;
}
[data-ff-el="root"].ff-623350297e7ec064e82a1d10 .ff-623350297e7ec064e82a1d10__error {
margin: 10px 0 0 0;
}
(function(w, d, t, h, s, n) {
w.FlodeskObject = n;
var fn = function() {
(w[n].q = w[n].q || []).push(arguments);
};
w[n] = w[n] || fn;
var f = d.getElementsByTagName(t)[0];
var v = '?v=' + Math.floor(new Date().getTime() / (120 * 1000)) * 60;
var sm = d.createElement(t);
sm.async = true;
sm.type = 'module';
sm.src = h + s + '.mjs' + v;
f.parentNode.insertBefore(sm, f);
var sn = d.createElement(t);
sn.async = true;
sn.noModule = true;
sn.src = h + s + '.js' + v;
f.parentNode.insertBefore(sn, f);
})(window, document, 'script', 'https://assets.flodesk.com', '/universal', 'fd');
window.fd('form:handle', {
formId: '623350297e7ec064e82a1d10',
rootEl: '.ff-623350297e7ec064e82a1d10',
});
 With the holidays quickly approaching, I’m sure you can think of a million and one ways to put these wire names to good use. Personalized Christmas ornaments? Check. Special gift tags? Check. Holiday dinner place settings? Check and check. The options are endless!
 Step Three: Finish off name with a sweet little heart!
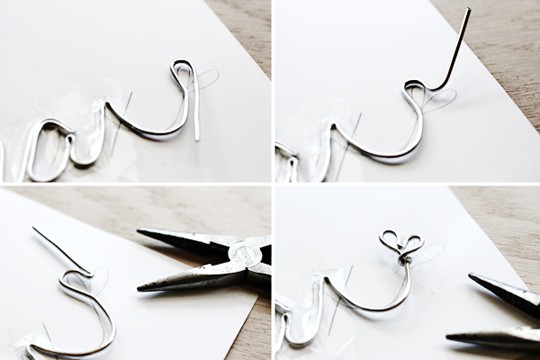 Step Four: Names with “T” or “X”: You’ll need to add a small piece of wire to complete your letter. Wrap a small piece of wire around the existing wire and secure with a drop of glue.
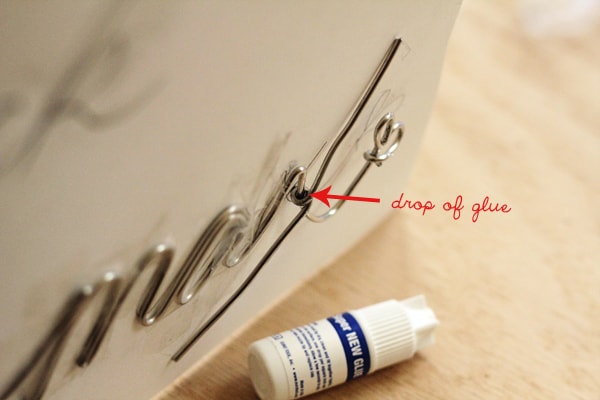 Step Five: Tie a basic knot at the top of the name, closest to the loop and secure with a drop of glue.
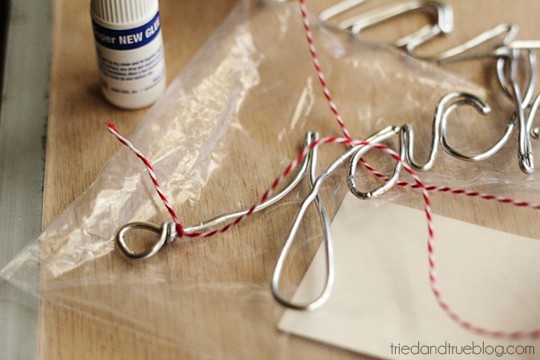 Step Six: Continue wrapping the yarn or twine tightly around each letter until the entire name is filled. As you can see in the picture, you’re going to have to unbend some of the tight corners to get the yarn/twine in there. Use the glue to help the yarn/twine stay in place in these tight corners. Just watch out you don’t glue your fingertips!
 Step Seven: Names with “T” or “X”: When you get to a letter that has a separate section like “t” or “x,” wrap all the way up to the section and then pull the yarn/twine to the end and wrap downward toward the center. Repeat for the bottom half of the line. Ok, that sounds crazy confusing…just follow what’s in the picture!
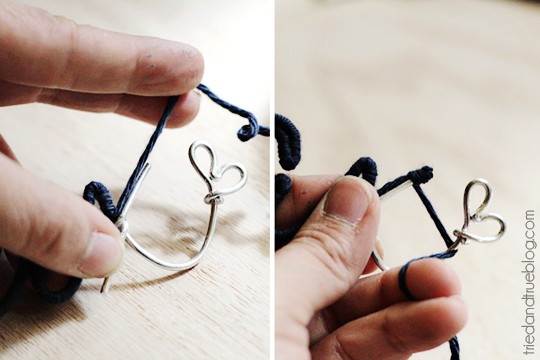 Step Eight: Finish off with a basic knot tied close to the base of the heart. Add a drop of glue to make sure the yarn/twine is secure and your new personalize craft ornaments are done! Now the fun part begins…
 What are you going to use your Personalized Wire Ornament for?!


Comments & Reviews
keri @ shaken together says
I cannot tell you how much I LOVE these! That striped twine HO HO HO is my absolute favorite!
Angie @ CCC says
The best ornaments ever I say! 🙂
Gwen says
So, so, so AWESOME! I love these guys!
Amanda @ Dreamsicle Sisters says
So cute! I am going to try and do this with a horse silhouette.