Subscribe to the newsletter for all the latest crafts + access to the creative library!
[data-ff-el="root"].ff-623350297e7ec064e82a1d10 *,
[data-ff-el="root"].ff-623350297e7ec064e82a1d10 *::before,
[data-ff-el="root"].ff-623350297e7ec064e82a1d10 *::after {
box-sizing: border-box;
}
[data-ff-el="root"].ff-623350297e7ec064e82a1d10 [tabindex="-1"]:focus {
outline: none !important;
}
[data-ff-el="root"].ff-623350297e7ec064e82a1d10 h1,
[data-ff-el="root"].ff-623350297e7ec064e82a1d10 h2,
[data-ff-el="root"].ff-623350297e7ec064e82a1d10 h3,
[data-ff-el="root"].ff-623350297e7ec064e82a1d10 h4,
[data-ff-el="root"].ff-623350297e7ec064e82a1d10 h5,
[data-ff-el="root"].ff-623350297e7ec064e82a1d10 h6 {
margin-top: 0;
margin-bottom: 0.7em;
}
[data-ff-el="root"].ff-623350297e7ec064e82a1d10 p {
margin-top: 0;
margin-bottom: 1rem;
}
[data-ff-el="root"].ff-623350297e7ec064e82a1d10 ol,
[data-ff-el="root"].ff-623350297e7ec064e82a1d10 ul,
[data-ff-el="root"].ff-623350297e7ec064e82a1d10 dl {
margin-top: 0;
margin-bottom: 1.4rem;
}
[data-ff-el="root"].ff-623350297e7ec064e82a1d10 ol ol,
[data-ff-el="root"].ff-623350297e7ec064e82a1d10 ul ul,
[data-ff-el="root"].ff-623350297e7ec064e82a1d10 ol ul,
[data-ff-el="root"].ff-623350297e7ec064e82a1d10 ul ol {
margin-bottom: 0;
}
[data-ff-el="root"].ff-623350297e7ec064e82a1d10 b,
[data-ff-el="root"].ff-623350297e7ec064e82a1d10 strong {
font-weight: bolder;
}
[data-ff-el="root"].ff-623350297e7ec064e82a1d10 small {
font-size: 80%;
}
[data-ff-el="root"].ff-623350297e7ec064e82a1d10 sub,
[data-ff-el="root"].ff-623350297e7ec064e82a1d10 sup {
position: relative;
font-size: 75%;
line-height: 0;
vertical-align: baseline;
}
[data-ff-el="root"].ff-623350297e7ec064e82a1d10 sub {
bottom: -0.25em;
}
[data-ff-el="root"].ff-623350297e7ec064e82a1d10 sup {
top: -0.5em;
}
[data-ff-el="root"].ff-623350297e7ec064e82a1d10 {
color: #000000;
text-decoration: none;
background-color: transparent;
-webkit-text-decoration-skip: objects;
}
[data-ff-el="root"].ff-623350297e7ec064e82a1d10 a:hover {
color: #4396fd;
text-decoration: none;
}
[data-ff-el="root"].ff-623350297e7ec064e82a1d10 img {
border-style: none;
vertical-align: middle;
}
[data-ff-el="root"].ff-623350297e7ec064e82a1d10 svg:not(:root) {
overflow: hidden;
}
[data-ff-el="root"].ff-623350297e7ec064e82a1d10,
[data-ff-el="root"].ff-623350297e7ec064e82a1d10 area,
[data-ff-el="root"].ff-623350297e7ec064e82a1d10 button,
[data-ff-el="root"].ff-623350297e7ec064e82a1d10 [role="button"],
[data-ff-el="root"].ff-623350297e7ec064e82a1d10 input,
[data-ff-el="root"].ff-623350297e7ec064e82a1d10 label,
[data-ff-el="root"].ff-623350297e7ec064e82a1d10 select,
[data-ff-el="root"].ff-623350297e7ec064e82a1d10 summary,
[data-ff-el="root"].ff-623350297e7ec064e82a1d10 textarea {
touch-action: manipulation;
}
[data-ff-el="root"].ff-623350297e7ec064e82a1d10 label {
display: inline-block;
font-weight: bolder;
margin-bottom: 0.7rem;
}
[data-ff-el="root"].ff-623350297e7ec064e82a1d10 button:focus {
outline: 1px dotted;
}
[data-ff-el="root"].ff-623350297e7ec064e82a1d10 input,
[data-ff-el="root"].ff-623350297e7ec064e82a1d10 button,
[data-ff-el="root"].ff-623350297e7ec064e82a1d10 select,
[data-ff-el="root"].ff-623350297e7ec064e82a1d10 optgroup,
[data-ff-el="root"].ff-623350297e7ec064e82a1d10 textarea {
margin: 0;
font-size: inherit;
font-family: inherit;
line-height: inherit;
}
[data-ff-el="root"].ff-623350297e7ec064e82a1d10 button,
[data-ff-el="root"].ff-623350297e7ec064e82a1d10 input {
overflow: visible;
}
[data-ff-el="root"].ff-623350297e7ec064e82a1d10 button,
[data-ff-el="root"].ff-623350297e7ec064e82a1d10 select {
text-transform: none;
}
[data-ff-el="root"].ff-623350297e7ec064e82a1d10 button,
html[data-ff-el="root"].ff-623350297e7ec064e82a1d10 [type="button"],
[data-ff-el="root"].ff-623350297e7ec064e82a1d10 [type="reset"],
[data-ff-el="root"].ff-623350297e7ec064e82a1d10 [type="submit"] {
-webkit-appearance: button;
}
[data-ff-el="root"].ff-623350297e7ec064e82a1d10 button::-moz-focus-inner,
[data-ff-el="root"].ff-623350297e7ec064e82a1d10 [type="button"]::-moz-focus-inner,
[data-ff-el="root"].ff-623350297e7ec064e82a1d10 [type="reset"]::-moz-focus-inner,
[data-ff-el="root"].ff-623350297e7ec064e82a1d10 [type="submit"]::-moz-focus-inner {
padding: 0;
border-style: none;
}
[data-ff-el="root"].ff-623350297e7ec064e82a1d10 input[type="radio"],
[data-ff-el="root"].ff-623350297e7ec064e82a1d10 input[type="checkbox"] {
padding: 0;
box-sizing: border-box;
}
[data-ff-el="root"].ff-623350297e7ec064e82a1d10 input[type="date"],
[data-ff-el="root"].ff-623350297e7ec064e82a1d10 input[type="time"],
[data-ff-el="root"].ff-623350297e7ec064e82a1d10 input[type="datetime-local"],
[data-ff-el="root"].ff-623350297e7ec064e82a1d10 input[type="month"] {
-webkit-appearance: listbox;
}
[data-ff-el="root"].ff-623350297e7ec064e82a1d10 textarea {
resize: vertical;
overflow: auto;
}
[data-ff-el="root"].ff-623350297e7ec064e82a1d10 [type="number"]::-webkit-inner-spin-button,
[data-ff-el="root"].ff-623350297e7ec064e82a1d10 [type="number"]::-webkit-outer-spin-button {
height: auto;
}
[data-ff-el="root"].ff-623350297e7ec064e82a1d10 [type="search"] {
outline-offset: -2px;
-webkit-appearance: none;
}
[data-ff-el="root"].ff-623350297e7ec064e82a1d10 [type="search"]::-webkit-search-cancel-button,
[data-ff-el="root"].ff-623350297e7ec064e82a1d10 [type="search"]::-webkit-search-decoration {
-webkit-appearance: none;
}
[data-ff-el="root"].ff-623350297e7ec064e82a1d10 ::-webkit-file-upload-button {
font: inherit;
-webkit-appearance: button;
}
[data-ff-el="root"].ff-623350297e7ec064e82a1d10 [hidden] {
display: none !important;
}
[data-ff-el="root"].ff-623350297e7ec064e82a1d10 .fd-form-control {
width: 100%;
display: block;
outline: none;
position: relative;
-webkit-appearance: none;
}
[data-ff-el="root"].ff-623350297e7ec064e82a1d10 .fd-form-control:focus {
outline: none;
}
[data-ff-el="root"].ff-623350297e7ec064e82a1d10 .fd-form-control::-webkit-input-placeholder {
color: transparent !important;
opacity: 0 !important;
}
[data-ff-el="root"].ff-623350297e7ec064e82a1d10 .fd-form-control::-moz-placeholder {
color: transparent !important;
opacity: 0 !important;
}
[data-ff-el="root"].ff-623350297e7ec064e82a1d10 .fd-form-control:-ms-input-placeholder {
color: transparent !important;
opacity: 0 !important;
}
[data-ff-el="root"].ff-623350297e7ec064e82a1d10 .fd-form-control::placeholder {
color: transparent !important;
opacity: 0 !important;
}
[data-ff-el="root"].ff-623350297e7ec064e82a1d10 .fd-form-label {
top: 0;
left: 0;
right: 0;
margin: 0;
overflow: hidden;
position: absolute;
white-space: nowrap;
text-overflow: ellipsis;
pointer-events: none;
}
[data-ff-el="root"].ff-623350297e7ec064e82a1d10 .fd-form-control:not(:-moz-placeholder-shown)+.fd-form-label {
opacity: 0;
}
[data-ff-el="root"].ff-623350297e7ec064e82a1d10 .fd-form-control:not(:-ms-input-placeholder)+.fd-form-label {
opacity: 0;
}
[data-ff-el="root"].ff-623350297e7ec064e82a1d10 .fd-form-control:not(:placeholder-shown)+.fd-form-label {
opacity: 0;
}
[data-ff-el="root"].ff-623350297e7ec064e82a1d10 .fd-form-description {
margin: 5px 0 0 0;
font-size: 0.8em;
}
[data-ff-el="root"].ff-623350297e7ec064e82a1d10 .fd-form-feedback {
margin: 5px 0 0 0;
font-size: 0.8em;
}
[data-ff-el="root"].ff-623350297e7ec064e82a1d10 .fd-form-group {
margin: 0 0 15px;
position: relative;
}
[data-ff-el="root"].ff-623350297e7ec064e82a1d10 .fd-form-group.fd-has-success .fd-form-feedback,
[data-ff-el="root"].ff-623350297e7ec064e82a1d10 .fd-form-group.fd-has-success .fd-form-check {
color: #02dba8 !important;
}
[data-ff-el="root"].ff-623350297e7ec064e82a1d10 .fd-form-group.fd-has-success .fd-form-control {
color: #02dba8 !important;
border-color: #02dba8 !important;
}
[data-ff-el="root"].ff-623350297e7ec064e82a1d10 .fd-form-group.fd-has-success .fd-form-feedback {
display: block;
}
[data-ff-el="root"].ff-623350297e7ec064e82a1d10 .fd-form-group.fd-has-error .fd-form-feedback,
[data-ff-el="root"].ff-623350297e7ec064e82a1d10 .fd-form-group.fd-has-error .fd-form-check {
color: #eb3d3b !important;
}
[data-ff-el="root"].ff-623350297e7ec064e82a1d10 .fd-form-group.fd-has-error .fd-form-control {
color: #eb3d3b !important;
border-color: #eb3d3b !important;
}
[data-ff-el="root"].ff-623350297e7ec064e82a1d10 .fd-form-group.fd-has-error .fd-form-feedback {
display: block;
}
[data-ff-el="root"].ff-623350297e7ec064e82a1d10 .fd-btn {
cursor: pointer;
display: -webkit-inline-box;
display: inline-flex;
outline: none;
max-width: 100%;
font-style: normal;
text-align: center;
-webkit-box-align: center;
align-items: center;
text-shadow: none;
white-space: normal;
-webkit-box-pack: center;
justify-content: center;
text-decoration: none;
}
[data-ff-el="root"].ff-623350297e7ec064e82a1d10 .fd-btn:hover {
outline: none;
}
[data-ff-el="root"].ff-623350297e7ec064e82a1d10 .fd-btn:focus {
outline: none;
}
[data-ff-el="root"].ff-623350297e7ec064e82a1d10 .fd-btn:disabled {
opacity: 0.8;
}
[data-ff-el="root"].ff-623350297e7ec064e82a1d10 .fd-form-check {
cursor: pointer;
margin: 0;
display: -webkit-box;
display: flex;
position: relative;
-webkit-box-align: center;
align-items: center;
padding-left: 30px;
}
[data-ff-el="root"].ff-623350297e7ec064e82a1d10 .fd-form-check__input {
top: 0;
left: 0;
width: 18px;
height: 18px;
opacity: 0;
z-index: -1;
position: absolute;
}
[data-ff-el="root"].ff-623350297e7ec064e82a1d10 .fd-form-check__checkmark {
top: 0;
left: 0;
width: 18px;
border: 1px solid #c4c4c4;
height: 18px;
display: block;
position: absolute;
background: #ffffff;
}
[data-ff-el="root"].ff-623350297e7ec064e82a1d10 .fd-form-check__label {
margin: 0;
font-size: 14px;
text-align: left;
word-break: break-word;
font-weight: 400;
line-height: 18px;
letter-spacing: 0.01em;
}
[data-ff-el="root"].ff-623350297e7ec064e82a1d10 .fd-form-check__input:checked+.fd-form-check__checkmark::after {
opacity: 1;
z-index: 1;
visibility: visible;
}
[data-ff-el="root"].ff-623350297e7ec064e82a1d10 .fd-form-check__checkmark::after {
top: -1px;
left: -1px;
width: 18px;
height: 18px;
content: "";
display: block;
opacity: 0;
z-index: -1;
position: absolute;
-webkit-transition: opacity 0.4s, z-index 0.4s;
transition: opacity 0.4s, z-index 0.4s;
visibility: inherit;
background-size: 12px;
background-image: url("data:image/svg+xml,%3csvg xmlns='http://www.w3.org/2000/svg' fill='black' width='12' height='10' viewBox='0 0 11.51 8.2'%3e%3ctitle%3echeck%3c/title%3e%3cpath d='M4.05%2c8.2A.74.74%2c0%2c0%2c1%2c3.52%2c8L.22%2c4.68A.75.75%2c0%2c0%2c1%2c1.28%2c3.62l3.3%2c3.3A.75.75%2c0%2c0%2c1%2c4.58%2c8%2c.74.74%2c0%2c0%2c1%2c4.05%2c8.2Z'/%3e%3cpath d='M4.06%2c8.2A.74.74%2c0%2c0%2c1%2c3.53%2c8a.75.75%2c0%2c0%2c1%2c0-1.06l6.7-6.7a.75.75%2c0%2c0%2c1%2c1.06%2c1.06L4.59%2c8A.74.74%2c0%2c0%2c1%2c4.06%2c8.2Z'/%3e%3c/svg%3e");
background-repeat: no-repeat;
background-position: center center;
}
[data-ff-el="root"].ff-623350297e7ec064e82a1d10 .fd-form-check__input:focus {
outline: none;
}
[data-ff-el="root"].ff-623350297e7ec064e82a1d10 .fd-form-content {
position: relative;
}
[data-ff-el="root"].ff-623350297e7ec064e82a1d10 .fd-has-success .fd-form-content {
display: none;
}
[data-ff-el="root"].ff-623350297e7ec064e82a1d10 .fd-has-captcha .fd-form-content>*:not(.fd-form-captcha) {
opacity: 0;
visibility: hidden;
}
[data-ff-el="root"].ff-623350297e7ec064e82a1d10 .fd-form-captcha {
top: 0;
left: 0;
width: 100%;
height: 100%;
display: -webkit-box;
display: flex;
position: absolute;
-webkit-box-align: center;
align-items: center;
-webkit-box-pack: start;
justify-content: flex-start;
}
[data-ff-el="root"].ff-623350297e7ec064e82a1d10 .fd-form-success {
display: none;
}
[data-ff-el="root"].ff-623350297e7ec064e82a1d10 .fd-has-success .fd-form-success {
display: block;
}
[data-ff-el="root"].ff-623350297e7ec064e82a1d10 .fd-form-success>*:last-child {
margin-bottom: 0;
}
[data-ff-el="root"].ff-623350297e7ec064e82a1d10 .fd-form-error {
display: none;
}
[data-ff-el="root"].ff-623350297e7ec064e82a1d10 .fd-has-error .fd-form-error {
display: block;
}
[data-ff-el="root"].ff-623350297e7ec064e82a1d10 .fd-form-error>*:last-child {
margin-bottom: 0;
}
[data-ff-el="root"].ff-623350297e7ec064e82a1d10 .fd-focus-visible,
[data-ff-el="root"].ff-623350297e7ec064e82a1d10 .fd-form-check__input.fd-focus-visible+.fd-form-check__checkmark {
outline: none;
box-shadow: 0 0 0 2px #fff, 0 0 0 6px #000 !important;
-webkit-transition: box-shadow 0.2s !important;
transition: box-shadow 0.2s !important;
}
[data-ff-el="root"].ff-623350297e7ec064e82a1d10 .fd-focus-visible,
[data-ff-el="root"].ff-623350297e7ec064e82a1d10 .fd-form-check__input.fd-focus-visible+.fd-form-check__checkmark {
outline: none;
box-shadow: 0 0 0 2px #ffffff, 0 0 0 6px #000 !important;
-webkit-transition: box-shadow 0.2s !important;
transition: box-shadow 0.2s !important;
}
[data-ff-el="root"].ff-623350297e7ec064e82a1d10 {
background: transparent;
}
[data-ff-el="root"].ff-623350297e7ec064e82a1d10 .ff-623350297e7ec064e82a1d10__container {
margin: 0 auto;
max-width: 1170px;
background: transparent;
}
[data-ff-el="root"].ff-623350297e7ec064e82a1d10 .ff-623350297e7ec064e82a1d10__form {
color: #333333;
width: 100%;
margin: 0;
font-size: 16px;
text-align: center;
font-family: Helvetica, sans-serif;
font-weight: 300;
line-height: 1.6;
letter-spacing: 0.1px;
text-transform: none;
}
@media (max-width: 767px) {
[data-ff-el="root"].ff-623350297e7ec064e82a1d10 .ff-623350297e7ec064e82a1d10__form {
word-wrap: anywhere;
word-break: break-word;
white-space: normal;
overflow-wrap: break-word;
}
}
[data-ff-el="root"].ff-623350297e7ec064e82a1d10 .ff-623350297e7ec064e82a1d10__title * {
line-height: inherit;
}
[data-ff-el="root"].ff-623350297e7ec064e82a1d10 .ff-623350297e7ec064e82a1d10__subtitle {
width: 100%;
margin: 0 0 30px;
display: block;
}
[data-ff-el="root"].ff-623350297e7ec064e82a1d10 .ff-623350297e7ec064e82a1d10__subtitle * {
line-height: inherit;
}
[data-ff-el="root"].ff-623350297e7ec064e82a1d10 .ff-623350297e7ec064e82a1d10__content {
margin: -10px -5px 0;
display: -webkit-box;
display: flex;
flex-wrap: wrap;
-webkit-box-align: start;
align-items: start;
-webkit-box-orient: horizontal;
-webkit-box-direction: normal;
flex-direction: row;
-webkit-box-pack: center;
justify-content: center;
}
@media (max-width: 767px) {
[data-ff-el="root"].ff-623350297e7ec064e82a1d10 .ff-623350297e7ec064e82a1d10__content {
display: block;
}
}
[data-ff-el="root"].ff-623350297e7ec064e82a1d10 .ff-623350297e7ec064e82a1d10__fields {
-webkit-box-flex: 0;
flex: 0 1 auto;
margin: 0px 0px 0;
display: -webkit-box;
display: flex;
flex-wrap: wrap;
max-width: -webkit-calc(100% + 10px);
max-width: calc(100% + 10px);
-webkit-box-pack: center;
justify-content: center;
}
@media (max-width: 767px) {
[data-ff-el="root"].ff-623350297e7ec064e82a1d10 .ff-623350297e7ec064e82a1d10__fields {
display: block;
}
}
[data-ff-el="root"].ff-623350297e7ec064e82a1d10 .ff-623350297e7ec064e82a1d10__field {
-webkit-box-flex: 1;
flex: 1 1;
margin: 10px 5px 0;
font-size: 13px;
max-width: 400px;
min-width: 200px;
text-align: left;
font-family: Helvetica, sans-serif;
font-weight: 400;
letter-spacing: 0.1px;
}
@media (max-width: 767px) {
[data-ff-el="root"].ff-623350297e7ec064e82a1d10 .ff-623350297e7ec064e82a1d10__field {
max-width: -webkit-calc(100% - 10px);
max-width: calc(100% - 10px);
}
}
[data-ff-el="root"].ff-623350297e7ec064e82a1d10 .ff-623350297e7ec064e82a1d10__control {
color: #000000;
border: 1px solid #dddddd;
height: 46px;
padding: 12px 20px;
font-size: 13px;
background: #ffffff;
text-align: left;
font-family: Helvetica, sans-serif;
font-weight: 400;
line-height: 20px;
border-radius: 0px;
letter-spacing: 0.1px;
text-transform: none;
}
[data-ff-el="root"].ff-623350297e7ec064e82a1d10 .ff-623350297e7ec064e82a1d10__label {
color: #000000;
border: 1px solid transparent;
padding: 12px 20px;
font-size: 13px;
text-align: left;
font-family: Helvetica, sans-serif;
font-weight: 400;
line-height: 20px;
letter-spacing: 0.1px;
text-transform: none;
}
[data-ff-el="root"].ff-623350297e7ec064e82a1d10 .ff-623350297e7ec064e82a1d10__preference {
margin: 30px 5px 0;
display: -webkit-box;
display: flex;
-webkit-box-orient: vertical;
-webkit-box-direction: normal;
flex-direction: column;
}
[data-ff-el="root"].ff-623350297e7ec064e82a1d10 .ff-623350297e7ec064e82a1d10__preference-title {
color: #333333;
width: 100%;
margin: 0 0 30px;
display: block;
font-size: 18px;
text-align: center;
font-family: Helvetica, sans-serif;
font-weight: 700;
line-height: 1.4;
letter-spacing: 0px;
text-transform: none;
}
[data-ff-el="root"].ff-623350297e7ec064e82a1d10 .ff-623350297e7ec064e82a1d10__preference-title * {
line-height: inherit;
}
[data-ff-el="root"].ff-623350297e7ec064e82a1d10 .ff-623350297e7ec064e82a1d10__preference-control {
width: 100%;
}
[data-ff-el="root"].ff-623350297e7ec064e82a1d10 .ff-623350297e7ec064e82a1d10__preference-list {
width: -webkit-calc(100% + 24px);
width: calc(100% + 24px);
margin: -8px -12px;
display: -webkit-box;
display: flex;
flex-wrap: wrap;
-webkit-box-pack: start;
justify-content: flex-start;
}
@media (max-width: 767px) {
[data-ff-el="root"].ff-623350297e7ec064e82a1d10 .ff-623350297e7ec064e82a1d10__preference-list {
display: block;
}
}
[data-ff-el="root"].ff-623350297e7ec064e82a1d10 .ff-623350297e7ec064e82a1d10__preference-item {
-webkit-box-flex: 0;
flex: 0 0 33.333333333333336%;
padding: 8px 12px;
}
[data-ff-el="root"].ff-623350297e7ec064e82a1d10 .ff-623350297e7ec064e82a1d10__form-check .fd-form-check__input {
top: 2.200000000000001px;
}
[data-ff-el="root"].ff-623350297e7ec064e82a1d10 .ff-623350297e7ec064e82a1d10__form-check .fd-form-check__checkmark {
top: 2.200000000000001px;
border-radius: 3px;
}
[data-ff-el="root"].ff-623350297e7ec064e82a1d10 .ff-623350297e7ec064e82a1d10__form-check .fd-form-check__label {
color: #333333;
font-size: 14px;
min-height: 22.400000000000002px;
font-family: Helvetica, sans-serif;
font-weight: 400;
line-height: 1.6;
letter-spacing: 0px;
text-transform: none;
}
[data-ff-el="root"].ff-623350297e7ec064e82a1d10 .ff-623350297e7ec064e82a1d10__form-check .fd-form-check__checkmark::after {
background-size: 12px;
background-image: url("data:image/svg+xml,%3csvg xmlns='http://www.w3.org/2000/svg' fill='black' width='12' height='10' viewBox='0 0 11.51 8.2'%3e%3ctitle%3echeck%3c/title%3e%3cpath d='M4.05%2c8.2A.74.74%2c0%2c0%2c1%2c3.52%2c8L.22%2c4.68A.75.75%2c0%2c0%2c1%2c1.28%2c3.62l3.3%2c3.3A.75.75%2c0%2c0%2c1%2c4.58%2c8%2c.74.74%2c0%2c0%2c1%2c4.05%2c8.2Z'/%3e%3cpath d='M4.06%2c8.2A.74.74%2c0%2c0%2c1%2c3.53%2c8a.75.75%2c0%2c0%2c1%2c0-1.06l6.7-6.7a.75.75%2c0%2c0%2c1%2c1.06%2c1.06L4.59%2c8A.74.74%2c0%2c0%2c1%2c4.06%2c8.2Z'/%3e%3c/svg%3e");
}
[data-ff-el="root"].ff-623350297e7ec064e82a1d10 .ff-623350297e7ec064e82a1d10__footer {
-webkit-box-flex: 0;
flex: 1;
margin-top: 10px;
text-align: center;
margin-left: 5px;
margin-right: 5px;
}
@media (max-width: 767px) {
[data-ff-el="root"].ff-623350297e7ec064e82a1d10 .ff-623350297e7ec064e82a1d10__footer {
margin-top: 25px;
}
}
[data-ff-el="root"].ff-623350297e7ec064e82a1d10 .ff-623350297e7ec064e82a1d10__button {
color: #000000;
border: 1px solid #ffd253;
display: inline-block;
padding: 12px 20px;
font-size: 13px;
background: #ffd253;
text-align: center;
font-family: Helvetica, sans-serif;
font-weight: 700;
line-height: 20px;
white-space: nowrap;
border-radius: 0px;
letter-spacing: 0.8px;
text-transform: uppercase;
width: 100%;
display: block;
}
[data-ff-el="root"].ff-623350297e7ec064e82a1d10 .ff-623350297e7ec064e82a1d10__error {
margin: 10px 0 0 0;
}
(function(w, d, t, h, s, n) {
w.FlodeskObject = n;
var fn = function() {
(w[n].q = w[n].q || []).push(arguments);
};
w[n] = w[n] || fn;
var f = d.getElementsByTagName(t)[0];
var v = '?v=' + Math.floor(new Date().getTime() / (120 * 1000)) * 60;
var sm = d.createElement(t);
sm.async = true;
sm.type = 'module';
sm.src = h + s + '.mjs' + v;
f.parentNode.insertBefore(sm, f);
var sn = d.createElement(t);
sn.async = true;
sn.noModule = true;
sn.src = h + s + '.js' + v;
f.parentNode.insertBefore(sn, f);
})(window, document, 'script', 'https://assets.flodesk.com', '/universal', 'fd');
window.fd('form:handle', {
formId: '623350297e7ec064e82a1d10',
rootEl: '.ff-623350297e7ec064e82a1d10',
});


Comments & Reviews
Arianna Pierce says
Hello! I had a question for you about possibly collaborating on something and was hoping you could email me back to discuss? Thanks so much!
– Arianna
ariannapierce2 (at) gmail (dot) com
Capri + 3--Theresa says
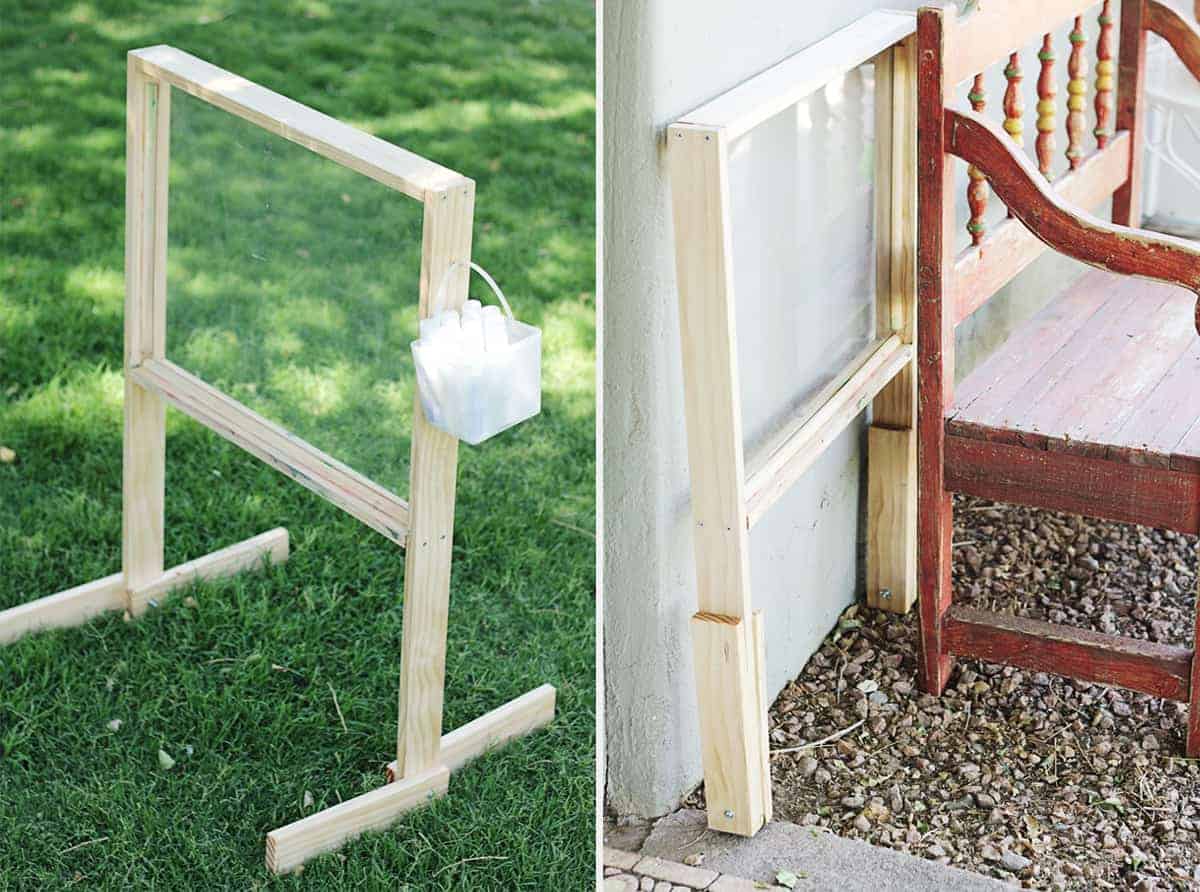
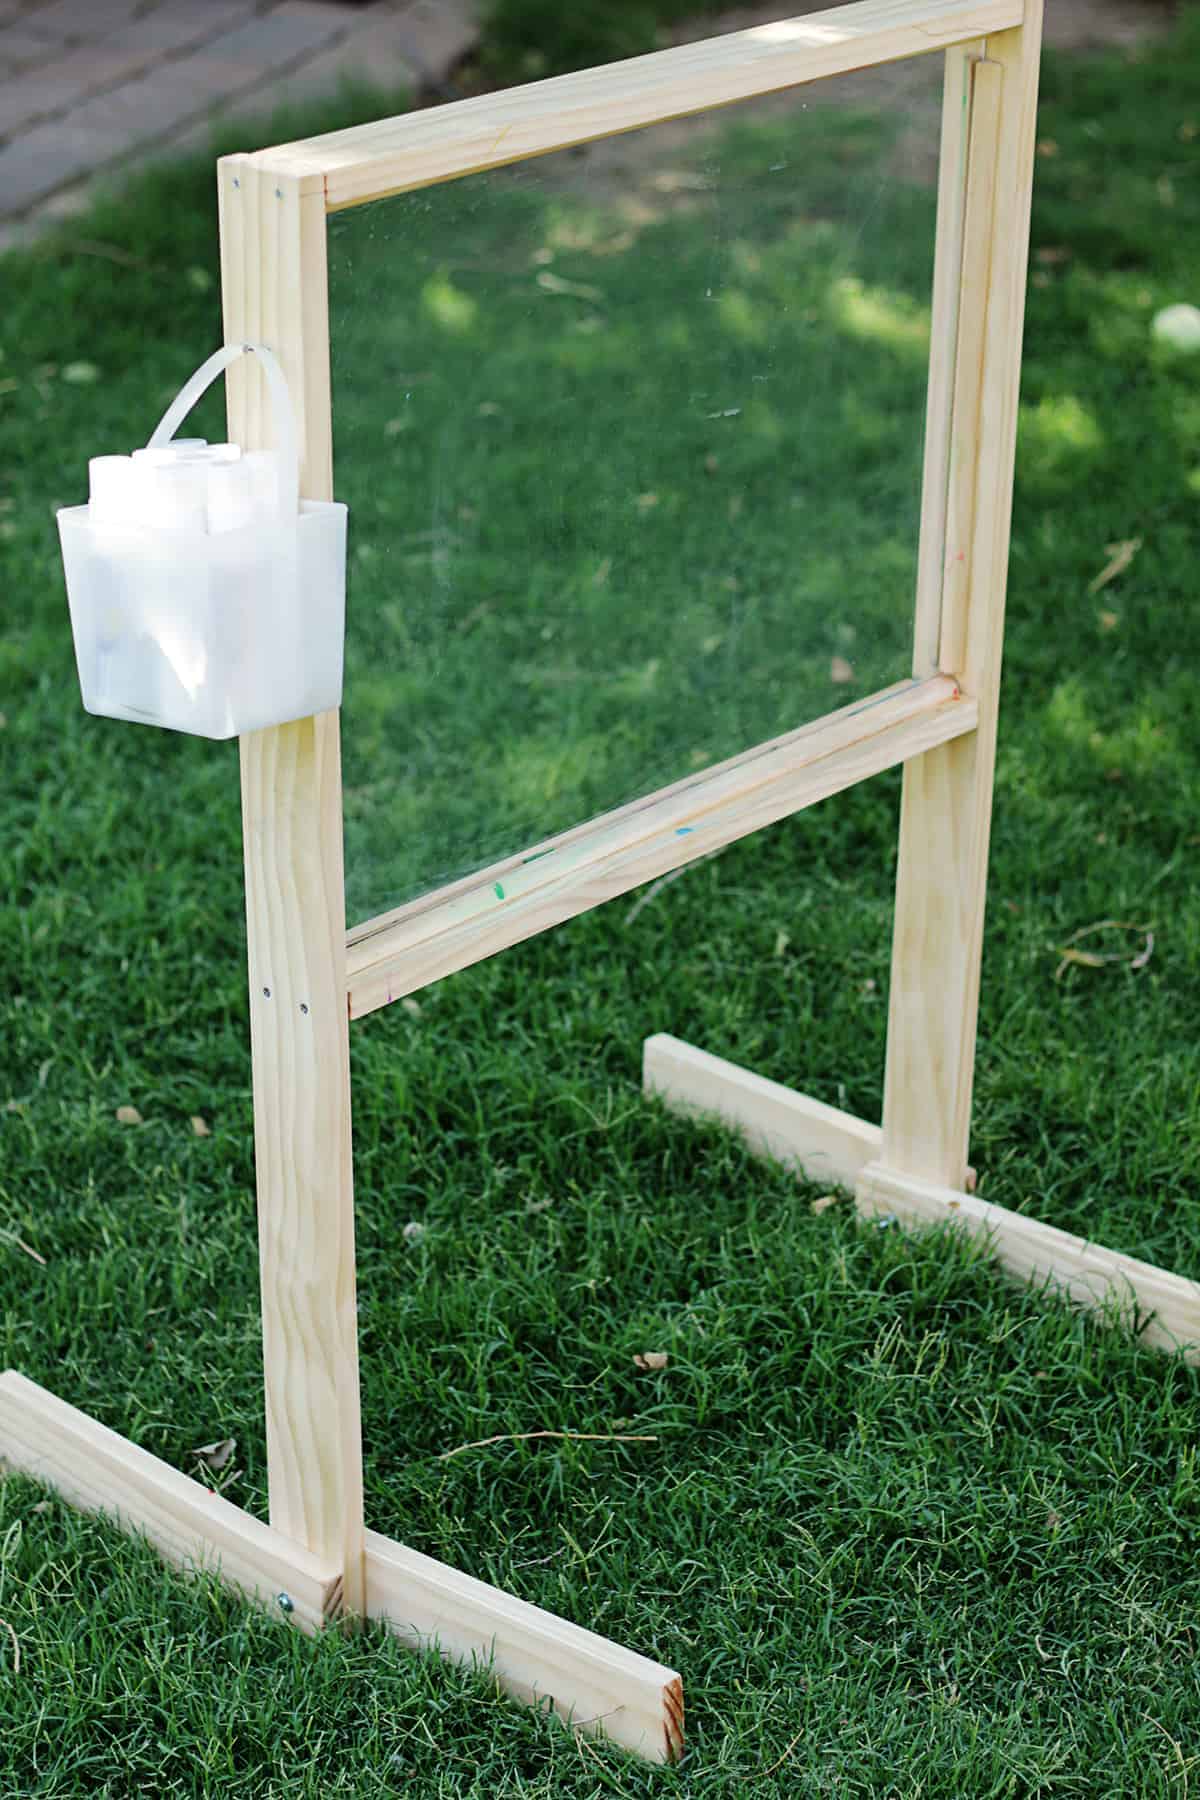
Your DIY easel looks great! If we didn’t already have easels, I would have my husband (who enjoys woodworking) make some of these. Thanks for the great tutorial.
Vanessa Brady says
Oh man, I bet your husband could whip this out super quickly!
Heather says
You are so clever! What a great project for the kiddos…can I play too – looks like fun!
Vanessa Brady says
Ok, I’ll admit it…I told the kids to play in the sandbox so that I could make my own art on the easel! 😀
Shannon @ Fox Hollow Cottage says
This is such a fun idea! Love that it folds down for storage. How smart is that?
( the models doing the demonstration were pretty cute too)
Yolanda Crisostomo says
Hi! This is an awesome tutorial! This is a nice and sturdy easel. I hope you don’t mind my sharing this with our Cafemom Holiday and Party Craft members. They’ll Love this! I also want to share this on my blog.
I’d like to invite you also to join our Cafemom group: http://www.cafemom.com/group/22263
yumi says
Loved this idea so much I made one for my 2 year old daughter. Made it slightly bigger so she can share with her siblings when they’re older. Thanks forsharing
Dawn says
HI,
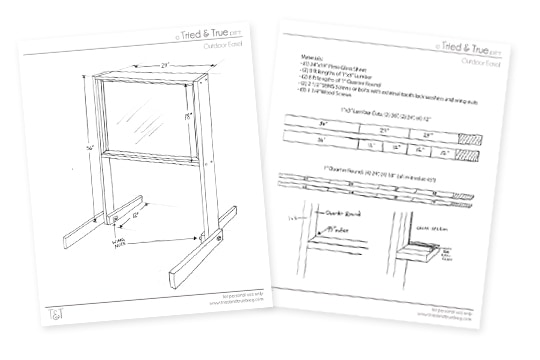
Upon looking into plexiglass I noticed there are several thickness and of course the thicker it is the more expensive it is. Which thickness did you use??
Thank you,
Dawn
Vanessa Brady says
I’m sorry for the late reply but we used a .25″ piece of plexiglass but the plans are adjustable to any thickness. Hope that helps!
Tiffany says
I’m having trouble getting an email that has this freebie in it. I’ve signed up according to the form above but I don’t see any email from tried and true blog should I be looking for something else?
Vanessa Brady says
Oh no, I’m sorry to hear that! Email me at [email protected] and we’ll get this worked out.