Subscribe to the newsletter for all the latest crafts + access to the creative library!
[data-ff-el="root"].ff-623350297e7ec064e82a1d10 *,
[data-ff-el="root"].ff-623350297e7ec064e82a1d10 *::before,
[data-ff-el="root"].ff-623350297e7ec064e82a1d10 *::after {
box-sizing: border-box;
}
[data-ff-el="root"].ff-623350297e7ec064e82a1d10 [tabindex="-1"]:focus {
outline: none !important;
}
[data-ff-el="root"].ff-623350297e7ec064e82a1d10 h1,
[data-ff-el="root"].ff-623350297e7ec064e82a1d10 h2,
[data-ff-el="root"].ff-623350297e7ec064e82a1d10 h3,
[data-ff-el="root"].ff-623350297e7ec064e82a1d10 h4,
[data-ff-el="root"].ff-623350297e7ec064e82a1d10 h5,
[data-ff-el="root"].ff-623350297e7ec064e82a1d10 h6 {
margin-top: 0;
margin-bottom: 0.7em;
}
[data-ff-el="root"].ff-623350297e7ec064e82a1d10 p {
margin-top: 0;
margin-bottom: 1rem;
}
[data-ff-el="root"].ff-623350297e7ec064e82a1d10 ol,
[data-ff-el="root"].ff-623350297e7ec064e82a1d10 ul,
[data-ff-el="root"].ff-623350297e7ec064e82a1d10 dl {
margin-top: 0;
margin-bottom: 1.4rem;
}
[data-ff-el="root"].ff-623350297e7ec064e82a1d10 ol ol,
[data-ff-el="root"].ff-623350297e7ec064e82a1d10 ul ul,
[data-ff-el="root"].ff-623350297e7ec064e82a1d10 ol ul,
[data-ff-el="root"].ff-623350297e7ec064e82a1d10 ul ol {
margin-bottom: 0;
}
[data-ff-el="root"].ff-623350297e7ec064e82a1d10 b,
[data-ff-el="root"].ff-623350297e7ec064e82a1d10 strong {
font-weight: bolder;
}
[data-ff-el="root"].ff-623350297e7ec064e82a1d10 small {
font-size: 80%;
}
[data-ff-el="root"].ff-623350297e7ec064e82a1d10 sub,
[data-ff-el="root"].ff-623350297e7ec064e82a1d10 sup {
position: relative;
font-size: 75%;
line-height: 0;
vertical-align: baseline;
}
[data-ff-el="root"].ff-623350297e7ec064e82a1d10 sub {
bottom: -0.25em;
}
[data-ff-el="root"].ff-623350297e7ec064e82a1d10 sup {
top: -0.5em;
}
[data-ff-el="root"].ff-623350297e7ec064e82a1d10 {
color: #000000;
text-decoration: none;
background-color: transparent;
-webkit-text-decoration-skip: objects;
}
[data-ff-el="root"].ff-623350297e7ec064e82a1d10 a:hover {
color: #4396fd;
text-decoration: none;
}
[data-ff-el="root"].ff-623350297e7ec064e82a1d10 img {
border-style: none;
vertical-align: middle;
}
[data-ff-el="root"].ff-623350297e7ec064e82a1d10 svg:not(:root) {
overflow: hidden;
}
[data-ff-el="root"].ff-623350297e7ec064e82a1d10,
[data-ff-el="root"].ff-623350297e7ec064e82a1d10 area,
[data-ff-el="root"].ff-623350297e7ec064e82a1d10 button,
[data-ff-el="root"].ff-623350297e7ec064e82a1d10 [role="button"],
[data-ff-el="root"].ff-623350297e7ec064e82a1d10 input,
[data-ff-el="root"].ff-623350297e7ec064e82a1d10 label,
[data-ff-el="root"].ff-623350297e7ec064e82a1d10 select,
[data-ff-el="root"].ff-623350297e7ec064e82a1d10 summary,
[data-ff-el="root"].ff-623350297e7ec064e82a1d10 textarea {
touch-action: manipulation;
}
[data-ff-el="root"].ff-623350297e7ec064e82a1d10 label {
display: inline-block;
font-weight: bolder;
margin-bottom: 0.7rem;
}
[data-ff-el="root"].ff-623350297e7ec064e82a1d10 button:focus {
outline: 1px dotted;
}
[data-ff-el="root"].ff-623350297e7ec064e82a1d10 input,
[data-ff-el="root"].ff-623350297e7ec064e82a1d10 button,
[data-ff-el="root"].ff-623350297e7ec064e82a1d10 select,
[data-ff-el="root"].ff-623350297e7ec064e82a1d10 optgroup,
[data-ff-el="root"].ff-623350297e7ec064e82a1d10 textarea {
margin: 0;
font-size: inherit;
font-family: inherit;
line-height: inherit;
}
[data-ff-el="root"].ff-623350297e7ec064e82a1d10 button,
[data-ff-el="root"].ff-623350297e7ec064e82a1d10 input {
overflow: visible;
}
[data-ff-el="root"].ff-623350297e7ec064e82a1d10 button,
[data-ff-el="root"].ff-623350297e7ec064e82a1d10 select {
text-transform: none;
}
[data-ff-el="root"].ff-623350297e7ec064e82a1d10 button,
html[data-ff-el="root"].ff-623350297e7ec064e82a1d10 [type="button"],
[data-ff-el="root"].ff-623350297e7ec064e82a1d10 [type="reset"],
[data-ff-el="root"].ff-623350297e7ec064e82a1d10 [type="submit"] {
-webkit-appearance: button;
}
[data-ff-el="root"].ff-623350297e7ec064e82a1d10 button::-moz-focus-inner,
[data-ff-el="root"].ff-623350297e7ec064e82a1d10 [type="button"]::-moz-focus-inner,
[data-ff-el="root"].ff-623350297e7ec064e82a1d10 [type="reset"]::-moz-focus-inner,
[data-ff-el="root"].ff-623350297e7ec064e82a1d10 [type="submit"]::-moz-focus-inner {
padding: 0;
border-style: none;
}
[data-ff-el="root"].ff-623350297e7ec064e82a1d10 input[type="radio"],
[data-ff-el="root"].ff-623350297e7ec064e82a1d10 input[type="checkbox"] {
padding: 0;
box-sizing: border-box;
}
[data-ff-el="root"].ff-623350297e7ec064e82a1d10 input[type="date"],
[data-ff-el="root"].ff-623350297e7ec064e82a1d10 input[type="time"],
[data-ff-el="root"].ff-623350297e7ec064e82a1d10 input[type="datetime-local"],
[data-ff-el="root"].ff-623350297e7ec064e82a1d10 input[type="month"] {
-webkit-appearance: listbox;
}
[data-ff-el="root"].ff-623350297e7ec064e82a1d10 textarea {
resize: vertical;
overflow: auto;
}
[data-ff-el="root"].ff-623350297e7ec064e82a1d10 [type="number"]::-webkit-inner-spin-button,
[data-ff-el="root"].ff-623350297e7ec064e82a1d10 [type="number"]::-webkit-outer-spin-button {
height: auto;
}
[data-ff-el="root"].ff-623350297e7ec064e82a1d10 [type="search"] {
outline-offset: -2px;
-webkit-appearance: none;
}
[data-ff-el="root"].ff-623350297e7ec064e82a1d10 [type="search"]::-webkit-search-cancel-button,
[data-ff-el="root"].ff-623350297e7ec064e82a1d10 [type="search"]::-webkit-search-decoration {
-webkit-appearance: none;
}
[data-ff-el="root"].ff-623350297e7ec064e82a1d10 ::-webkit-file-upload-button {
font: inherit;
-webkit-appearance: button;
}
[data-ff-el="root"].ff-623350297e7ec064e82a1d10 [hidden] {
display: none !important;
}
[data-ff-el="root"].ff-623350297e7ec064e82a1d10 .fd-form-control {
width: 100%;
display: block;
outline: none;
position: relative;
-webkit-appearance: none;
}
[data-ff-el="root"].ff-623350297e7ec064e82a1d10 .fd-form-control:focus {
outline: none;
}
[data-ff-el="root"].ff-623350297e7ec064e82a1d10 .fd-form-control::-webkit-input-placeholder {
color: transparent !important;
opacity: 0 !important;
}
[data-ff-el="root"].ff-623350297e7ec064e82a1d10 .fd-form-control::-moz-placeholder {
color: transparent !important;
opacity: 0 !important;
}
[data-ff-el="root"].ff-623350297e7ec064e82a1d10 .fd-form-control:-ms-input-placeholder {
color: transparent !important;
opacity: 0 !important;
}
[data-ff-el="root"].ff-623350297e7ec064e82a1d10 .fd-form-control::placeholder {
color: transparent !important;
opacity: 0 !important;
}
[data-ff-el="root"].ff-623350297e7ec064e82a1d10 .fd-form-label {
top: 0;
left: 0;
right: 0;
margin: 0;
overflow: hidden;
position: absolute;
white-space: nowrap;
text-overflow: ellipsis;
pointer-events: none;
}
[data-ff-el="root"].ff-623350297e7ec064e82a1d10 .fd-form-control:not(:-moz-placeholder-shown)+.fd-form-label {
opacity: 0;
}
[data-ff-el="root"].ff-623350297e7ec064e82a1d10 .fd-form-control:not(:-ms-input-placeholder)+.fd-form-label {
opacity: 0;
}
[data-ff-el="root"].ff-623350297e7ec064e82a1d10 .fd-form-control:not(:placeholder-shown)+.fd-form-label {
opacity: 0;
}
[data-ff-el="root"].ff-623350297e7ec064e82a1d10 .fd-form-description {
margin: 5px 0 0 0;
font-size: 0.8em;
}
[data-ff-el="root"].ff-623350297e7ec064e82a1d10 .fd-form-feedback {
margin: 5px 0 0 0;
font-size: 0.8em;
}
[data-ff-el="root"].ff-623350297e7ec064e82a1d10 .fd-form-group {
margin: 0 0 15px;
position: relative;
}
[data-ff-el="root"].ff-623350297e7ec064e82a1d10 .fd-form-group.fd-has-success .fd-form-feedback,
[data-ff-el="root"].ff-623350297e7ec064e82a1d10 .fd-form-group.fd-has-success .fd-form-check {
color: #02dba8 !important;
}
[data-ff-el="root"].ff-623350297e7ec064e82a1d10 .fd-form-group.fd-has-success .fd-form-control {
color: #02dba8 !important;
border-color: #02dba8 !important;
}
[data-ff-el="root"].ff-623350297e7ec064e82a1d10 .fd-form-group.fd-has-success .fd-form-feedback {
display: block;
}
[data-ff-el="root"].ff-623350297e7ec064e82a1d10 .fd-form-group.fd-has-error .fd-form-feedback,
[data-ff-el="root"].ff-623350297e7ec064e82a1d10 .fd-form-group.fd-has-error .fd-form-check {
color: #eb3d3b !important;
}
[data-ff-el="root"].ff-623350297e7ec064e82a1d10 .fd-form-group.fd-has-error .fd-form-control {
color: #eb3d3b !important;
border-color: #eb3d3b !important;
}
[data-ff-el="root"].ff-623350297e7ec064e82a1d10 .fd-form-group.fd-has-error .fd-form-feedback {
display: block;
}
[data-ff-el="root"].ff-623350297e7ec064e82a1d10 .fd-btn {
cursor: pointer;
display: -webkit-inline-box;
display: inline-flex;
outline: none;
max-width: 100%;
font-style: normal;
text-align: center;
-webkit-box-align: center;
align-items: center;
text-shadow: none;
white-space: normal;
-webkit-box-pack: center;
justify-content: center;
text-decoration: none;
}
[data-ff-el="root"].ff-623350297e7ec064e82a1d10 .fd-btn:hover {
outline: none;
}
[data-ff-el="root"].ff-623350297e7ec064e82a1d10 .fd-btn:focus {
outline: none;
}
[data-ff-el="root"].ff-623350297e7ec064e82a1d10 .fd-btn:disabled {
opacity: 0.8;
}
[data-ff-el="root"].ff-623350297e7ec064e82a1d10 .fd-form-check {
cursor: pointer;
margin: 0;
display: -webkit-box;
display: flex;
position: relative;
-webkit-box-align: center;
align-items: center;
padding-left: 30px;
}
[data-ff-el="root"].ff-623350297e7ec064e82a1d10 .fd-form-check__input {
top: 0;
left: 0;
width: 18px;
height: 18px;
opacity: 0;
z-index: -1;
position: absolute;
}
[data-ff-el="root"].ff-623350297e7ec064e82a1d10 .fd-form-check__checkmark {
top: 0;
left: 0;
width: 18px;
border: 1px solid #c4c4c4;
height: 18px;
display: block;
position: absolute;
background: #ffffff;
}
[data-ff-el="root"].ff-623350297e7ec064e82a1d10 .fd-form-check__label {
margin: 0;
font-size: 14px;
text-align: left;
word-break: break-word;
font-weight: 400;
line-height: 18px;
letter-spacing: 0.01em;
}
[data-ff-el="root"].ff-623350297e7ec064e82a1d10 .fd-form-check__input:checked+.fd-form-check__checkmark::after {
opacity: 1;
z-index: 1;
visibility: visible;
}
[data-ff-el="root"].ff-623350297e7ec064e82a1d10 .fd-form-check__checkmark::after {
top: -1px;
left: -1px;
width: 18px;
height: 18px;
content: "";
display: block;
opacity: 0;
z-index: -1;
position: absolute;
-webkit-transition: opacity 0.4s, z-index 0.4s;
transition: opacity 0.4s, z-index 0.4s;
visibility: inherit;
background-size: 12px;
background-image: url("data:image/svg+xml,%3csvg xmlns='http://www.w3.org/2000/svg' fill='black' width='12' height='10' viewBox='0 0 11.51 8.2'%3e%3ctitle%3echeck%3c/title%3e%3cpath d='M4.05%2c8.2A.74.74%2c0%2c0%2c1%2c3.52%2c8L.22%2c4.68A.75.75%2c0%2c0%2c1%2c1.28%2c3.62l3.3%2c3.3A.75.75%2c0%2c0%2c1%2c4.58%2c8%2c.74.74%2c0%2c0%2c1%2c4.05%2c8.2Z'/%3e%3cpath d='M4.06%2c8.2A.74.74%2c0%2c0%2c1%2c3.53%2c8a.75.75%2c0%2c0%2c1%2c0-1.06l6.7-6.7a.75.75%2c0%2c0%2c1%2c1.06%2c1.06L4.59%2c8A.74.74%2c0%2c0%2c1%2c4.06%2c8.2Z'/%3e%3c/svg%3e");
background-repeat: no-repeat;
background-position: center center;
}
[data-ff-el="root"].ff-623350297e7ec064e82a1d10 .fd-form-check__input:focus {
outline: none;
}
[data-ff-el="root"].ff-623350297e7ec064e82a1d10 .fd-form-content {
position: relative;
}
[data-ff-el="root"].ff-623350297e7ec064e82a1d10 .fd-has-success .fd-form-content {
display: none;
}
[data-ff-el="root"].ff-623350297e7ec064e82a1d10 .fd-has-captcha .fd-form-content>*:not(.fd-form-captcha) {
opacity: 0;
visibility: hidden;
}
[data-ff-el="root"].ff-623350297e7ec064e82a1d10 .fd-form-captcha {
top: 0;
left: 0;
width: 100%;
height: 100%;
display: -webkit-box;
display: flex;
position: absolute;
-webkit-box-align: center;
align-items: center;
-webkit-box-pack: start;
justify-content: flex-start;
}
[data-ff-el="root"].ff-623350297e7ec064e82a1d10 .fd-form-success {
display: none;
}
[data-ff-el="root"].ff-623350297e7ec064e82a1d10 .fd-has-success .fd-form-success {
display: block;
}
[data-ff-el="root"].ff-623350297e7ec064e82a1d10 .fd-form-success>*:last-child {
margin-bottom: 0;
}
[data-ff-el="root"].ff-623350297e7ec064e82a1d10 .fd-form-error {
display: none;
}
[data-ff-el="root"].ff-623350297e7ec064e82a1d10 .fd-has-error .fd-form-error {
display: block;
}
[data-ff-el="root"].ff-623350297e7ec064e82a1d10 .fd-form-error>*:last-child {
margin-bottom: 0;
}
[data-ff-el="root"].ff-623350297e7ec064e82a1d10 .fd-focus-visible,
[data-ff-el="root"].ff-623350297e7ec064e82a1d10 .fd-form-check__input.fd-focus-visible+.fd-form-check__checkmark {
outline: none;
box-shadow: 0 0 0 2px #fff, 0 0 0 6px #000 !important;
-webkit-transition: box-shadow 0.2s !important;
transition: box-shadow 0.2s !important;
}
[data-ff-el="root"].ff-623350297e7ec064e82a1d10 .fd-focus-visible,
[data-ff-el="root"].ff-623350297e7ec064e82a1d10 .fd-form-check__input.fd-focus-visible+.fd-form-check__checkmark {
outline: none;
box-shadow: 0 0 0 2px #ffffff, 0 0 0 6px #000 !important;
-webkit-transition: box-shadow 0.2s !important;
transition: box-shadow 0.2s !important;
}
[data-ff-el="root"].ff-623350297e7ec064e82a1d10 {
background: transparent;
}
[data-ff-el="root"].ff-623350297e7ec064e82a1d10 .ff-623350297e7ec064e82a1d10__container {
margin: 0 auto;
max-width: 1170px;
background: transparent;
}
[data-ff-el="root"].ff-623350297e7ec064e82a1d10 .ff-623350297e7ec064e82a1d10__form {
color: #333333;
width: 100%;
margin: 0;
font-size: 16px;
text-align: center;
font-family: Helvetica, sans-serif;
font-weight: 300;
line-height: 1.6;
letter-spacing: 0.1px;
text-transform: none;
}
@media (max-width: 767px) {
[data-ff-el="root"].ff-623350297e7ec064e82a1d10 .ff-623350297e7ec064e82a1d10__form {
word-wrap: anywhere;
word-break: break-word;
white-space: normal;
overflow-wrap: break-word;
}
}
[data-ff-el="root"].ff-623350297e7ec064e82a1d10 .ff-623350297e7ec064e82a1d10__title * {
line-height: inherit;
}
[data-ff-el="root"].ff-623350297e7ec064e82a1d10 .ff-623350297e7ec064e82a1d10__subtitle {
width: 100%;
margin: 0 0 30px;
display: block;
}
[data-ff-el="root"].ff-623350297e7ec064e82a1d10 .ff-623350297e7ec064e82a1d10__subtitle * {
line-height: inherit;
}
[data-ff-el="root"].ff-623350297e7ec064e82a1d10 .ff-623350297e7ec064e82a1d10__content {
margin: -10px -5px 0;
display: -webkit-box;
display: flex;
flex-wrap: wrap;
-webkit-box-align: start;
align-items: start;
-webkit-box-orient: horizontal;
-webkit-box-direction: normal;
flex-direction: row;
-webkit-box-pack: center;
justify-content: center;
}
@media (max-width: 767px) {
[data-ff-el="root"].ff-623350297e7ec064e82a1d10 .ff-623350297e7ec064e82a1d10__content {
display: block;
}
}
[data-ff-el="root"].ff-623350297e7ec064e82a1d10 .ff-623350297e7ec064e82a1d10__fields {
-webkit-box-flex: 0;
flex: 0 1 auto;
margin: 0px 0px 0;
display: -webkit-box;
display: flex;
flex-wrap: wrap;
max-width: -webkit-calc(100% + 10px);
max-width: calc(100% + 10px);
-webkit-box-pack: center;
justify-content: center;
}
@media (max-width: 767px) {
[data-ff-el="root"].ff-623350297e7ec064e82a1d10 .ff-623350297e7ec064e82a1d10__fields {
display: block;
}
}
[data-ff-el="root"].ff-623350297e7ec064e82a1d10 .ff-623350297e7ec064e82a1d10__field {
-webkit-box-flex: 1;
flex: 1 1;
margin: 10px 5px 0;
font-size: 13px;
max-width: 400px;
min-width: 200px;
text-align: left;
font-family: Helvetica, sans-serif;
font-weight: 400;
letter-spacing: 0.1px;
}
@media (max-width: 767px) {
[data-ff-el="root"].ff-623350297e7ec064e82a1d10 .ff-623350297e7ec064e82a1d10__field {
max-width: -webkit-calc(100% - 10px);
max-width: calc(100% - 10px);
}
}
[data-ff-el="root"].ff-623350297e7ec064e82a1d10 .ff-623350297e7ec064e82a1d10__control {
color: #000000;
border: 1px solid #dddddd;
height: 46px;
padding: 12px 20px;
font-size: 13px;
background: #ffffff;
text-align: left;
font-family: Helvetica, sans-serif;
font-weight: 400;
line-height: 20px;
border-radius: 0px;
letter-spacing: 0.1px;
text-transform: none;
}
[data-ff-el="root"].ff-623350297e7ec064e82a1d10 .ff-623350297e7ec064e82a1d10__label {
color: #000000;
border: 1px solid transparent;
padding: 12px 20px;
font-size: 13px;
text-align: left;
font-family: Helvetica, sans-serif;
font-weight: 400;
line-height: 20px;
letter-spacing: 0.1px;
text-transform: none;
}
[data-ff-el="root"].ff-623350297e7ec064e82a1d10 .ff-623350297e7ec064e82a1d10__preference {
margin: 30px 5px 0;
display: -webkit-box;
display: flex;
-webkit-box-orient: vertical;
-webkit-box-direction: normal;
flex-direction: column;
}
[data-ff-el="root"].ff-623350297e7ec064e82a1d10 .ff-623350297e7ec064e82a1d10__preference-title {
color: #333333;
width: 100%;
margin: 0 0 30px;
display: block;
font-size: 18px;
text-align: center;
font-family: Helvetica, sans-serif;
font-weight: 700;
line-height: 1.4;
letter-spacing: 0px;
text-transform: none;
}
[data-ff-el="root"].ff-623350297e7ec064e82a1d10 .ff-623350297e7ec064e82a1d10__preference-title * {
line-height: inherit;
}
[data-ff-el="root"].ff-623350297e7ec064e82a1d10 .ff-623350297e7ec064e82a1d10__preference-control {
width: 100%;
}
[data-ff-el="root"].ff-623350297e7ec064e82a1d10 .ff-623350297e7ec064e82a1d10__preference-list {
width: -webkit-calc(100% + 24px);
width: calc(100% + 24px);
margin: -8px -12px;
display: -webkit-box;
display: flex;
flex-wrap: wrap;
-webkit-box-pack: start;
justify-content: flex-start;
}
@media (max-width: 767px) {
[data-ff-el="root"].ff-623350297e7ec064e82a1d10 .ff-623350297e7ec064e82a1d10__preference-list {
display: block;
}
}
[data-ff-el="root"].ff-623350297e7ec064e82a1d10 .ff-623350297e7ec064e82a1d10__preference-item {
-webkit-box-flex: 0;
flex: 0 0 33.333333333333336%;
padding: 8px 12px;
}
[data-ff-el="root"].ff-623350297e7ec064e82a1d10 .ff-623350297e7ec064e82a1d10__form-check .fd-form-check__input {
top: 2.200000000000001px;
}
[data-ff-el="root"].ff-623350297e7ec064e82a1d10 .ff-623350297e7ec064e82a1d10__form-check .fd-form-check__checkmark {
top: 2.200000000000001px;
border-radius: 3px;
}
[data-ff-el="root"].ff-623350297e7ec064e82a1d10 .ff-623350297e7ec064e82a1d10__form-check .fd-form-check__label {
color: #333333;
font-size: 14px;
min-height: 22.400000000000002px;
font-family: Helvetica, sans-serif;
font-weight: 400;
line-height: 1.6;
letter-spacing: 0px;
text-transform: none;
}
[data-ff-el="root"].ff-623350297e7ec064e82a1d10 .ff-623350297e7ec064e82a1d10__form-check .fd-form-check__checkmark::after {
background-size: 12px;
background-image: url("data:image/svg+xml,%3csvg xmlns='http://www.w3.org/2000/svg' fill='black' width='12' height='10' viewBox='0 0 11.51 8.2'%3e%3ctitle%3echeck%3c/title%3e%3cpath d='M4.05%2c8.2A.74.74%2c0%2c0%2c1%2c3.52%2c8L.22%2c4.68A.75.75%2c0%2c0%2c1%2c1.28%2c3.62l3.3%2c3.3A.75.75%2c0%2c0%2c1%2c4.58%2c8%2c.74.74%2c0%2c0%2c1%2c4.05%2c8.2Z'/%3e%3cpath d='M4.06%2c8.2A.74.74%2c0%2c0%2c1%2c3.53%2c8a.75.75%2c0%2c0%2c1%2c0-1.06l6.7-6.7a.75.75%2c0%2c0%2c1%2c1.06%2c1.06L4.59%2c8A.74.74%2c0%2c0%2c1%2c4.06%2c8.2Z'/%3e%3c/svg%3e");
}
[data-ff-el="root"].ff-623350297e7ec064e82a1d10 .ff-623350297e7ec064e82a1d10__footer {
-webkit-box-flex: 0;
flex: 1;
margin-top: 10px;
text-align: center;
margin-left: 5px;
margin-right: 5px;
}
@media (max-width: 767px) {
[data-ff-el="root"].ff-623350297e7ec064e82a1d10 .ff-623350297e7ec064e82a1d10__footer {
margin-top: 25px;
}
}
[data-ff-el="root"].ff-623350297e7ec064e82a1d10 .ff-623350297e7ec064e82a1d10__button {
color: #000000;
border: 1px solid #ffd253;
display: inline-block;
padding: 12px 20px;
font-size: 13px;
background: #ffd253;
text-align: center;
font-family: Helvetica, sans-serif;
font-weight: 700;
line-height: 20px;
white-space: nowrap;
border-radius: 0px;
letter-spacing: 0.8px;
text-transform: uppercase;
width: 100%;
display: block;
}
[data-ff-el="root"].ff-623350297e7ec064e82a1d10 .ff-623350297e7ec064e82a1d10__error {
margin: 10px 0 0 0;
}
(function(w, d, t, h, s, n) {
w.FlodeskObject = n;
var fn = function() {
(w[n].q = w[n].q || []).push(arguments);
};
w[n] = w[n] || fn;
var f = d.getElementsByTagName(t)[0];
var v = '?v=' + Math.floor(new Date().getTime() / (120 * 1000)) * 60;
var sm = d.createElement(t);
sm.async = true;
sm.type = 'module';
sm.src = h + s + '.mjs' + v;
f.parentNode.insertBefore(sm, f);
var sn = d.createElement(t);
sn.async = true;
sn.noModule = true;
sn.src = h + s + '.js' + v;
f.parentNode.insertBefore(sn, f);
})(window, document, 'script', 'https://assets.flodesk.com', '/universal', 'fd');
window.fd('form:handle', {
formId: '623350297e7ec064e82a1d10',
rootEl: '.ff-623350297e7ec064e82a1d10',
});
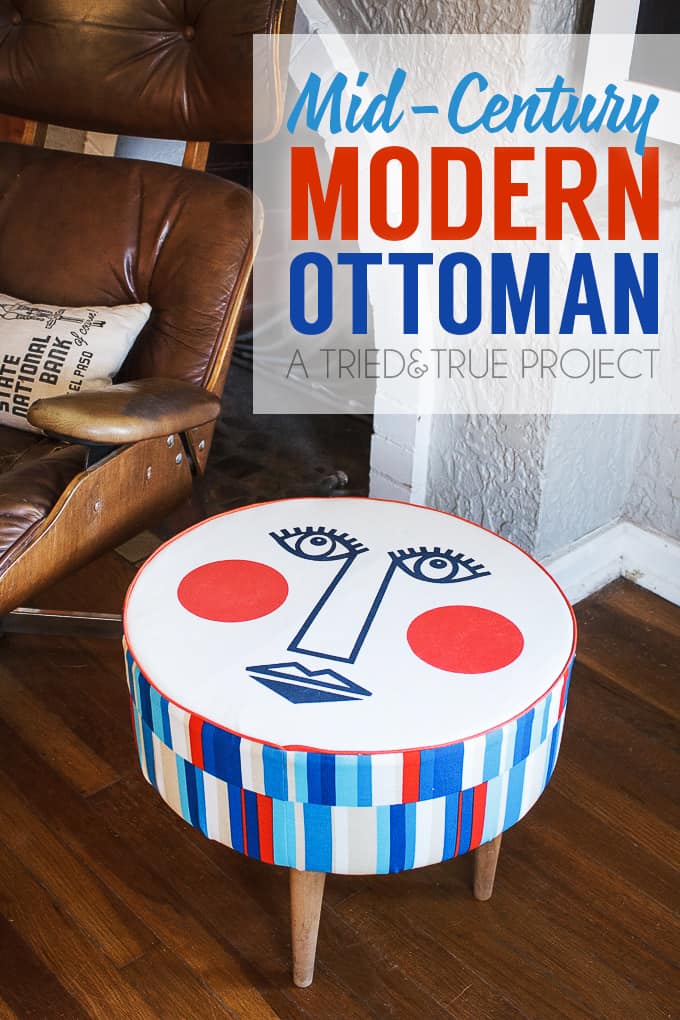 I’m crazy about all things mid-century modern but I have extra special place in my heart for the illustrations of Alexander Girard! His clean lines and bold colors are as perfect today as they were in the middle of the last century. He’s such a favorite of mine that I decided to revisit my Girard-Inspired Floor Cushion tutorial that I made about 7 years ago, updating it with a Silhouette cut stencil, a foam pouf from Fairfield, and gorgeous fabric from Robert Kaufman. Let’s get started!
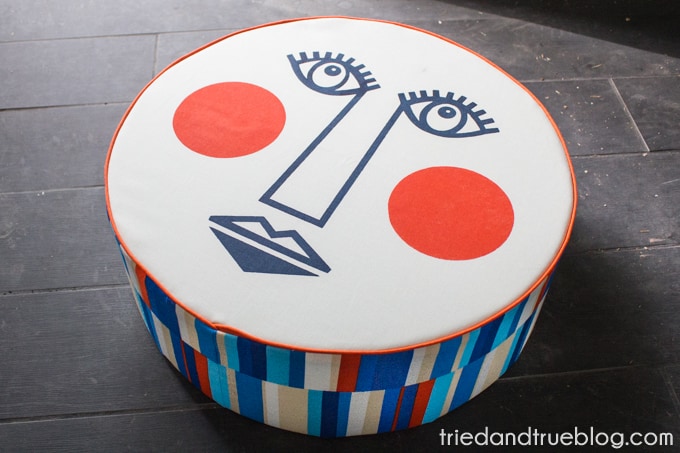 This post contains affiliate links for your convenience and to assist in the maintenance of this site.


 (the thicker the better!)
 Step Two. Using the Cushion Foam to trace around plus an additional 3/4″ seam allowance, cut two circles of Natural fabric.
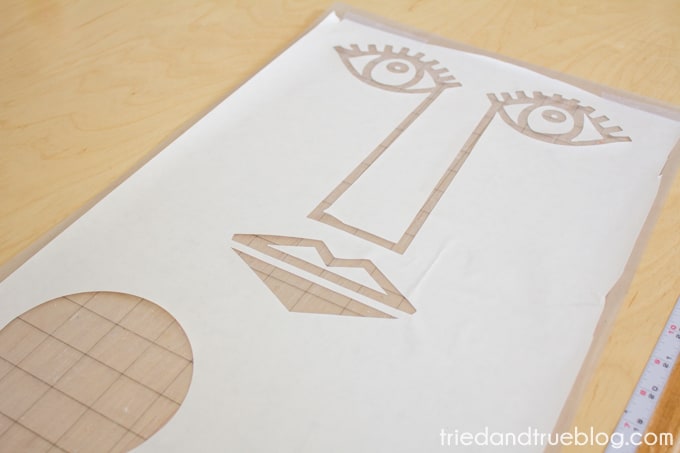
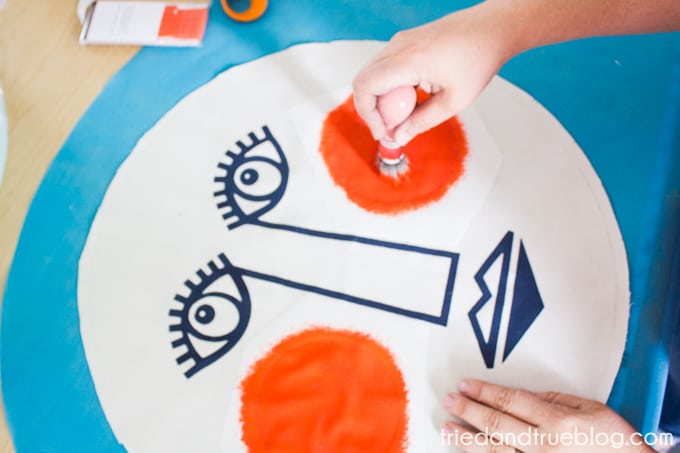
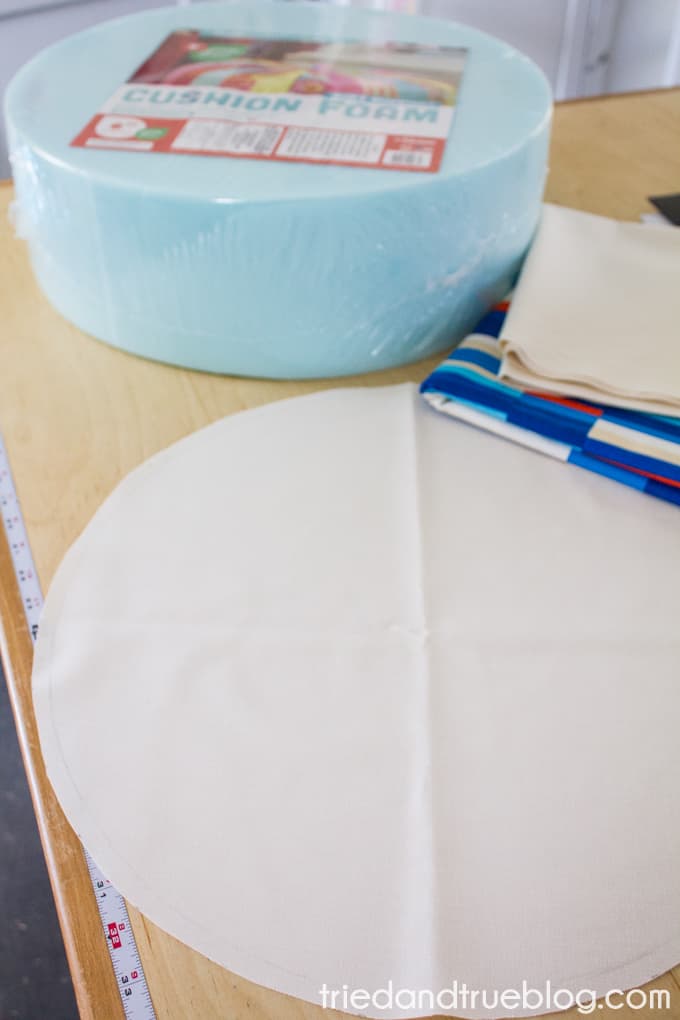 Step Three. Working one section at a time (Face first, then the cheeks), iron the freezer paper stencil in place and begin applying fabric ink with spouncer. Allow to dry and then carefully remove the stencil. Apply cheeks in same manner. When both paints have dried completely (24 hrs.), iron the fabric ink to set and sew two circles together. Sew orange piping around the inner seam.
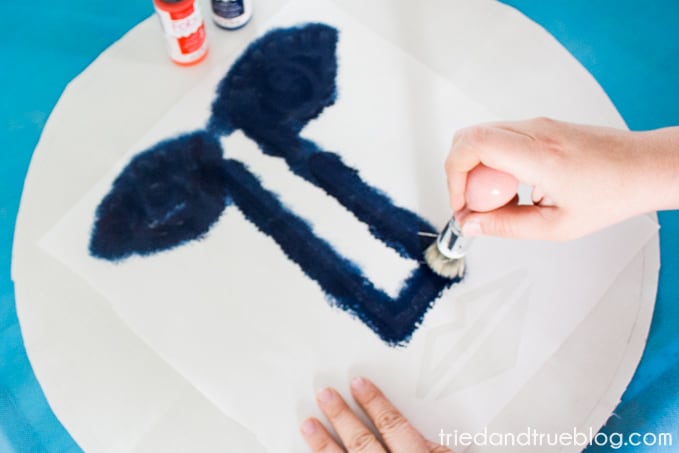
 Step Four. Cut a 56 2/3″ x 10″ strip of coordinating fabric. Sew ends together (1/4″ seam), pin around the sewn-together circle panels and sew in place. Take care with the piping!
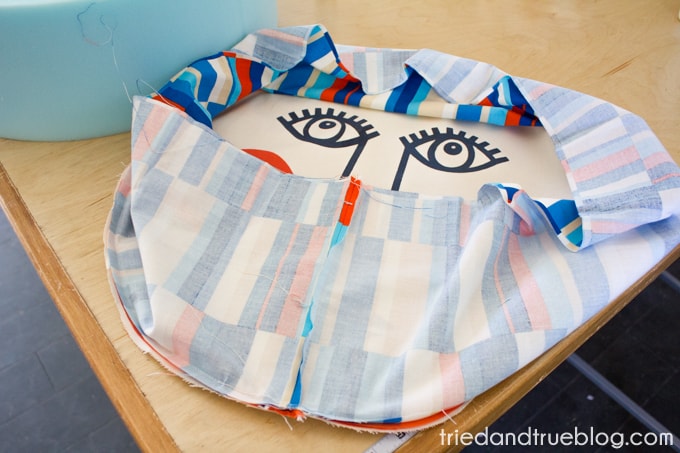 Step Five. Turn ottoman cover right side out and pull over foam cushion. Position wood disc inside of cover and tightly staple the fabric in place.
 Step Six. You can decide if you want to cover the bottom with a layer of Oly-fun or sandwich everything between another wood disc. If you do use Oly-fun, I would suggest going with a darker color so that you can’t see the fabric edges underneath.
 Step Seven. Follow the manufacturers instructions for attaching the Top Plate Hardware and Round Taper Legs. Voilà! You have officially made your very own Mid-Century Modern Ottoman!
 Mid-Century Love
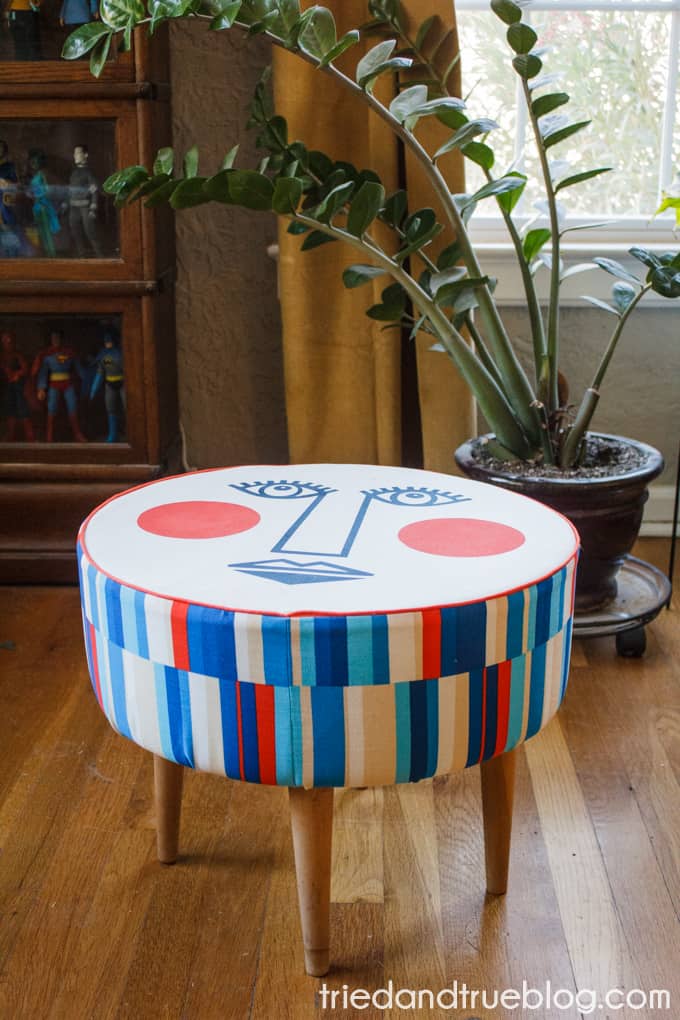 Mid-Century Love
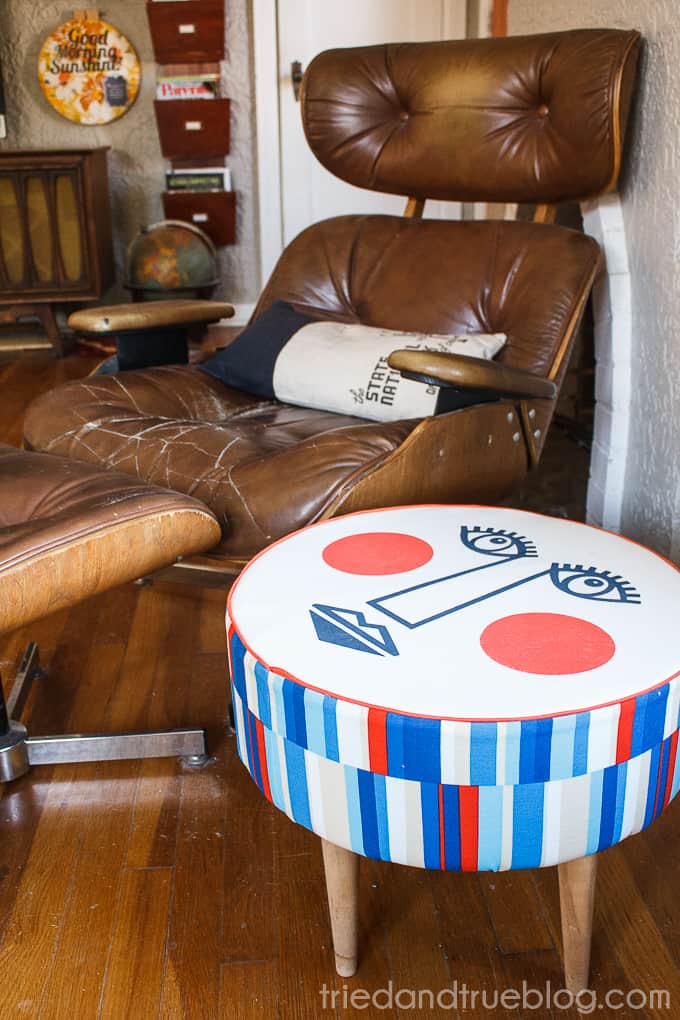


Comments & Reviews
Morena's Corner (@MorenasCorner) says
Sooooo awesome! I love it!
Allison Murray says
This is perfection. I LOVE IT SO MUCH! Thanks for the cut file. I don’t know what I’m going to use it on just yet but I do know that I’m going to be using it on something!!!
Erica @ Dwell Beautiful says
This is so fun! I just love the bright cheery colors and that cheeky face – too adorable!