
Gingerbread House Homemade Clay Ornament
Use supplies from Sculpey to make this easy and adorable gingerbread house ornament!
Servings: 1 ornament
Cost: $8
Equipment
- Oven
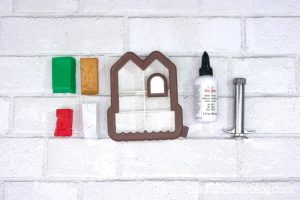
Ingredients
Instructions
- Let's talk a bit about the supplies. I added the tools I used for this project to the supply list but you can always just use what you have around the house. The only absolute essentials are the clay products, hot glue, and the cookie cutter.
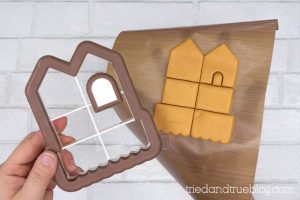
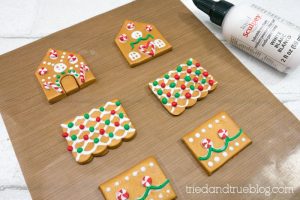
- Roll out the gold Sculpey until about ¼" thick. Use the cookie cutter to cut out the house shapes.
- Using various techniques, create the embellishments for the gingerbread house. This is where you really can have tons of fun! I made a red and white cane and then sliced off small discs for peppermint candies. The candy canes were made with the clay extruder and then rolled together in the correct shape.
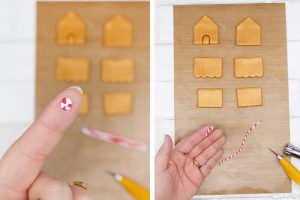
- Use the Liquid Sculpey to adhere all the embellishments to the gingerbread house sides.
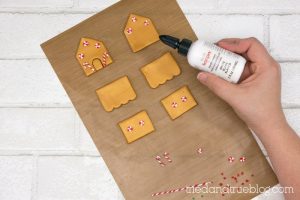
- If you want to add shingles like I did, use a toothpick or a sharp tool dipped in Liquid Sculpey. The bottle comes with an applicator tip but it was a bit too thick for me. Don't worry about the small embellishments not adhering well. The Liquid Sculpey is the perfect glue!
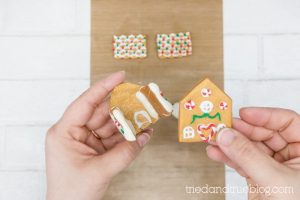
- Follow the package instructions to bake all the pieces. Allow to cool completely and then assemble with the white hot glue.
- Add a bit of additional white hot glue to the edges to mimic the look of dripping frosting.
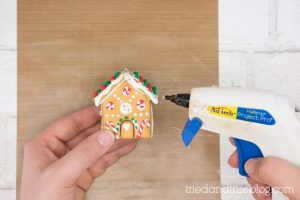
- Make sure to remember to insert a small screw hook on the top of the ornament while the hot glue is still warm. Add a ribbon to the hook, hang on your tree, and enjoy the season!